2. Create Products to Sell
Before you can sell a shirt, hat, mug… on Inkica, you need to create a product: pick a ready-made item from the catalog (a blueprint), then attach your design to it. You use this product to:
- Match orders that come in automatically from marketplaces (SKU mapping).
- Pick from when you create an order by hand.
How to create a new product
-
Go to Catalog — the library of ready-made product templates (shirts, hoodies, hats, mugs, necklaces, phone cases…).
-
Browse by category (Clothing, Home Decor…) or search for the item you want, then click it to see the details.
- The New arrivals tab (next to For you) shows only items added in the last 30 days — the same ones with the New badge. The other filters still work on it.
- Clothing is split by garment type: hover the Clothing tab to jump straight to T-Shirts, Hoodies, Sweatshirts, Tank Tops, Jerseys & Sportswear… Use the Gender & age filter (Men, Women, Unisex, Kids, Baby) to narrow it down further — Men and Women also show unisex items, Kids also shows baby items. For example Hoodies + Kids shows only kids’ hoodies.
- The Collections row right below the categories (for example All-Over Print, Embroidery) groups items with the same print style or theme that are spread across several categories. You can pick one category and one collection at the same time to narrow things down — for example Clothing + All-Over Print shows only all-over-print clothing. Click the selected collection again to clear the filter.
-
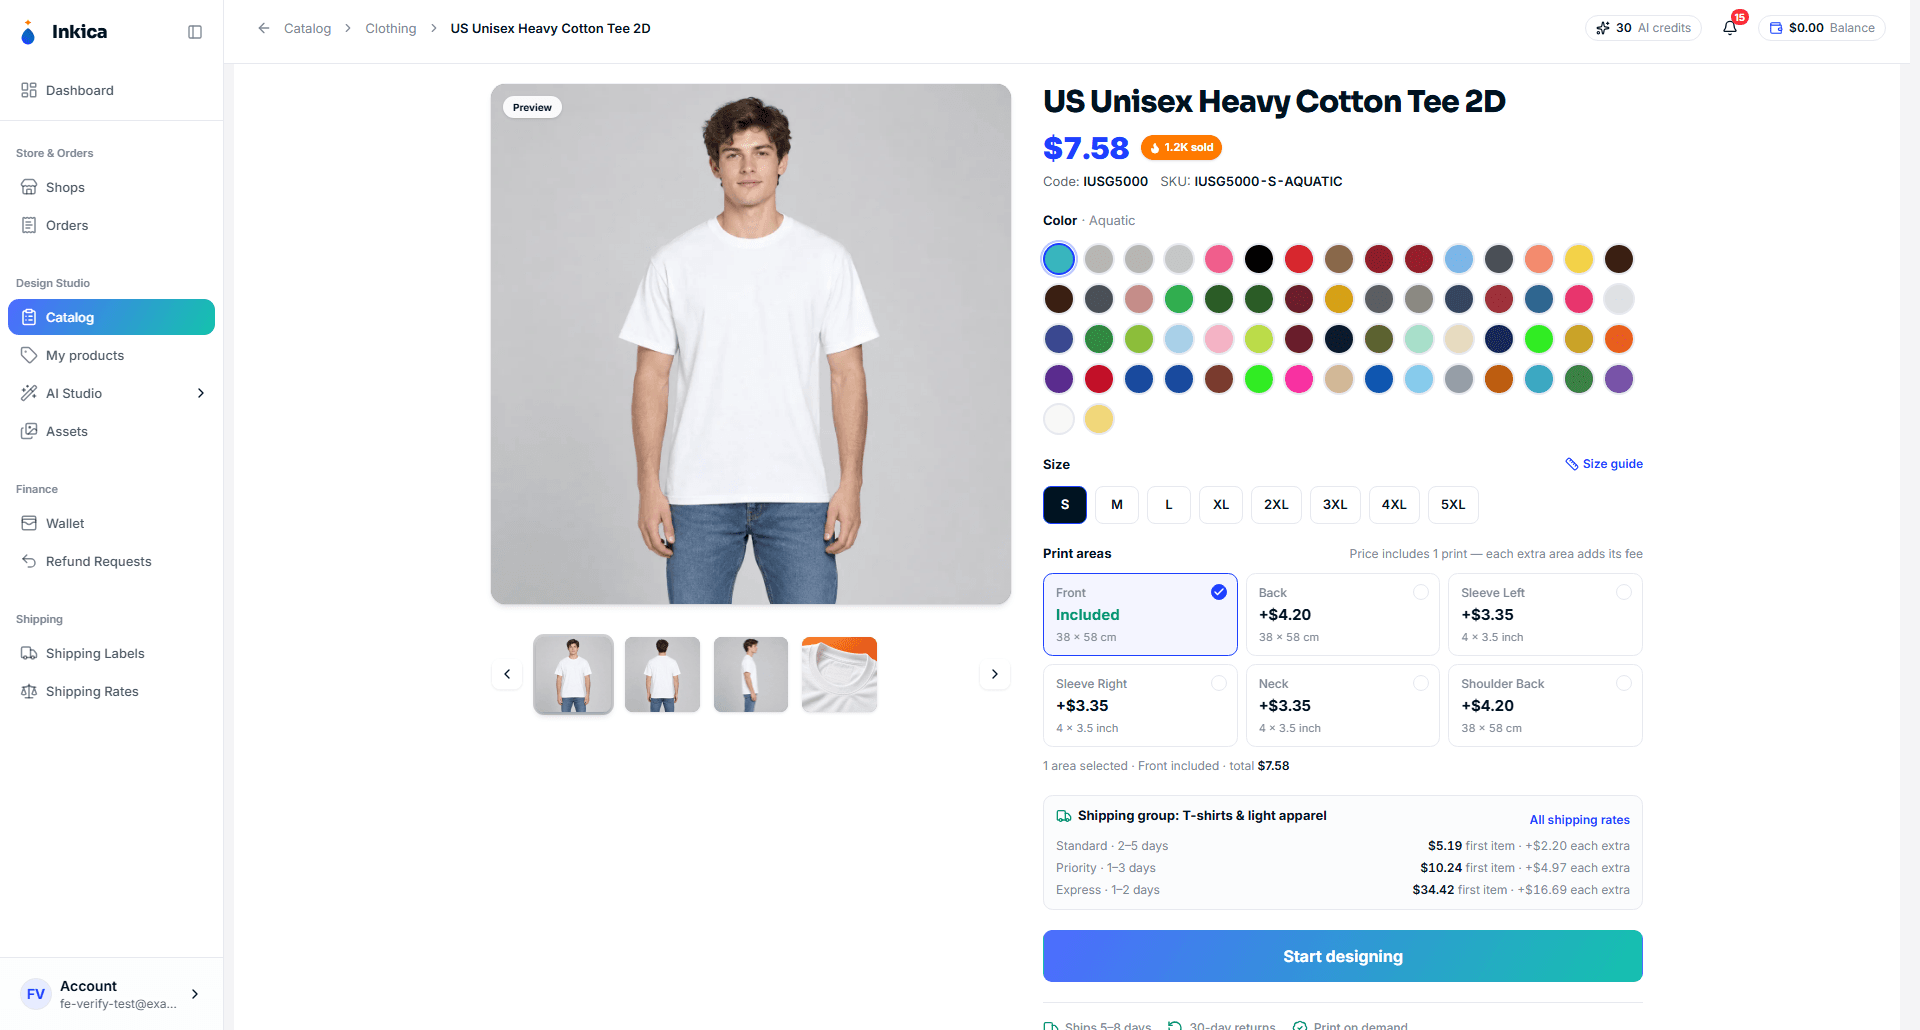
On the details page, choose:
- The product color
- The size
- The print position (front/back/sleeve…) — the price already includes 1 print, and each additional print position adds that position’s fee (see “How pricing works” below)
Right below the price you’ll see the Code — the item’s code in the Catalog (for example
IUSG5000) — and the SKU for the exact color/size you’ve selected (for exampleIUSG5000-S-AQUATIC). Use these when mapping SKUs from marketplace orders, or when you need to tell the support team which item you mean. -
Click Start designing — this opens the design screen (Product Editor).
How pricing works
The price shown in the Catalog is the price including 1 print (the line “Price includes 1 print — each extra area adds its fee” next to the Print areas heading) — the same way other POD platforms quote prices:
- The included print is the item’s main position: the front for shirts/hoodies, the case face for phone cases, the Charm for jewelry.
- The position counted as the included print shows Included; every other position shows +$X — exactly the amount it adds to the price.
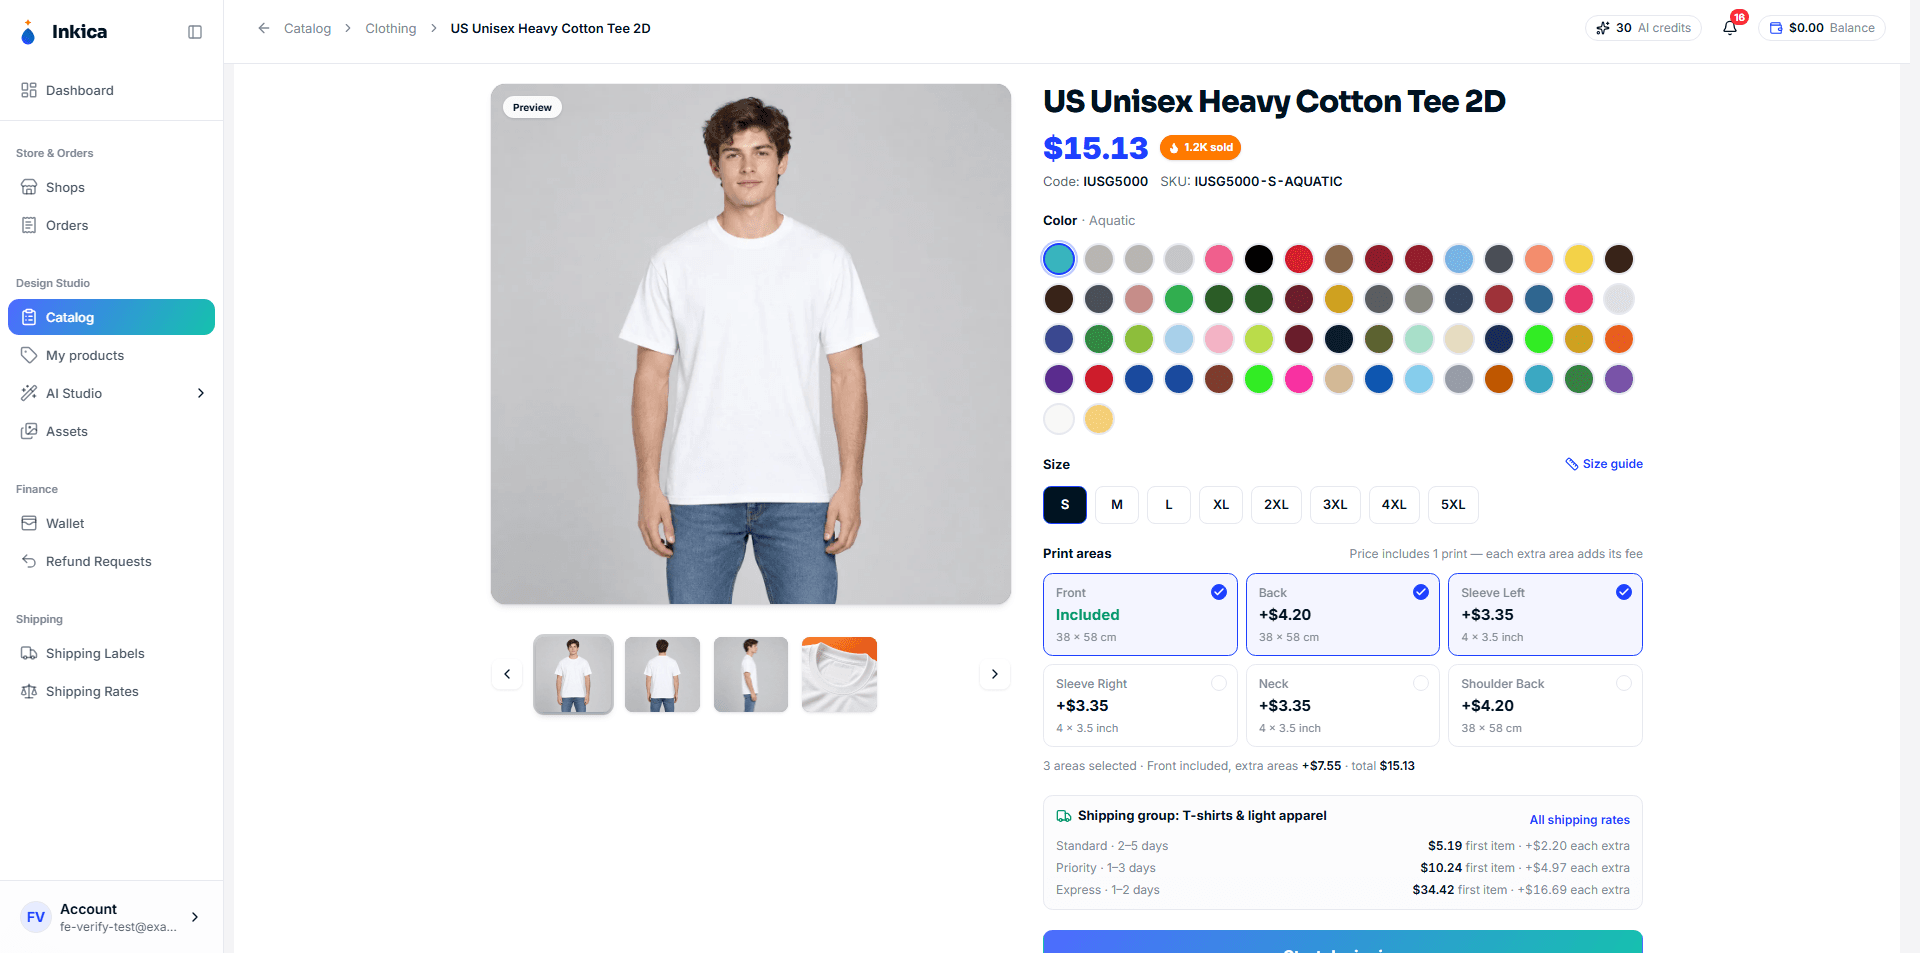
- Below the boxes there’s a summary line, for example “3 areas selected · Front included, extra areas +$7.55 · total $15.13”, and the large price at the top of the page updates to match.
- Printing on just 1 position other than the main one (for example only the back) still counts as 1 print — you don’t pay extra, unless that position has a higher fee than the main one: in that case the box shows Included +$X, where X is the difference.
- Only positions that have a design image are charged; a position with only a mockup image isn’t charged.
Illustrative example (made-up numbers): a T-shirt costs $14 including a front print, the back print fee is $6, and each sleeve is $3.50 → front only = $14 · back only = $14 · front + back = $20 · front + back + 2 sleeves = $27. Some items may have their own print fees that differ from the usual ones — the price shown in the Catalog and when you create an order is always the correct price for that item.
💡 Acrylic products (ornaments, standees, signs, car visor clips…) take one design. To print both sides, pick the catalog with (2-Sided) in its name — the same design is printed on both sides, and the price already includes it.
To see the prices of every item in the Catalog at a glance (by size, color and print method), open the Inkica Catalog price list on Google Sheets — each tab is a product group, and prices include 1 print. The prices in the Catalog and when you create a new order are the official ones.
Shipping fees for an item
The Shipping group box on the details page tells you which shipping group the item belongs to (for example T-shirts & light apparel, Mugs & tumblers) and that group’s shipping fee for each delivery speed (Standard, Priority, Express):
- first item — the fee for the first item in an order.
- each extra — the extra fee for each additional item.
Shipping fees don’t change by size or color. An order with products from several different groups still pays only 1 shipping fee, taken from whichever group gives the highest fee. Click All shipping rates to see the fee table for every group.
Attach a design in the Product Editor
For each print position (the Front, Back, Sleeve… tabs), you can use:
- Uploads — upload a design image from your computer (JPG/PNG up to 100 MiB, SVG up to 20 MiB, no larger than 30000×30000 px). Images you’ve uploaded are also saved in your Image library so you can reuse them.
- Galleries — pick an image you’ve used before.
- Text — add text directly onto the product.
After adding an image, you can drag, resize or rotate it to position it, or click Fill print area to make the image fill the whole print frame. A newly added image is placed at its true size (based on its pixels and 150 DPI), shrunk only if it overflows the frame, centered, and never scaled up. The toolbar also has AI remove background (removes the image background with AI) and a Copy to… button to copy a design to another print position. The AI mockup button in the top bar opens the Mockup preview panel: AI creates a mockup for each print position that has a design (about 20 seconds per image) — click an image to make it the main photo (Main); the main photo is saved when you click Save.
Use your own mockup: in the Mockup preview panel, the first tile of each position is Upload your mockup — pick an image from your Image library or upload a new one. It shows up as Your mockup and becomes the main photo; click Save to keep it. Once you have your own mockup, the tile reads Replace your mockup. Items without AI mockups show a Mockup button in the top bar instead, and the panel only offers the upload. Print positions without a design don’t appear in the panel (they are only listed on the last line) — add a design there first.
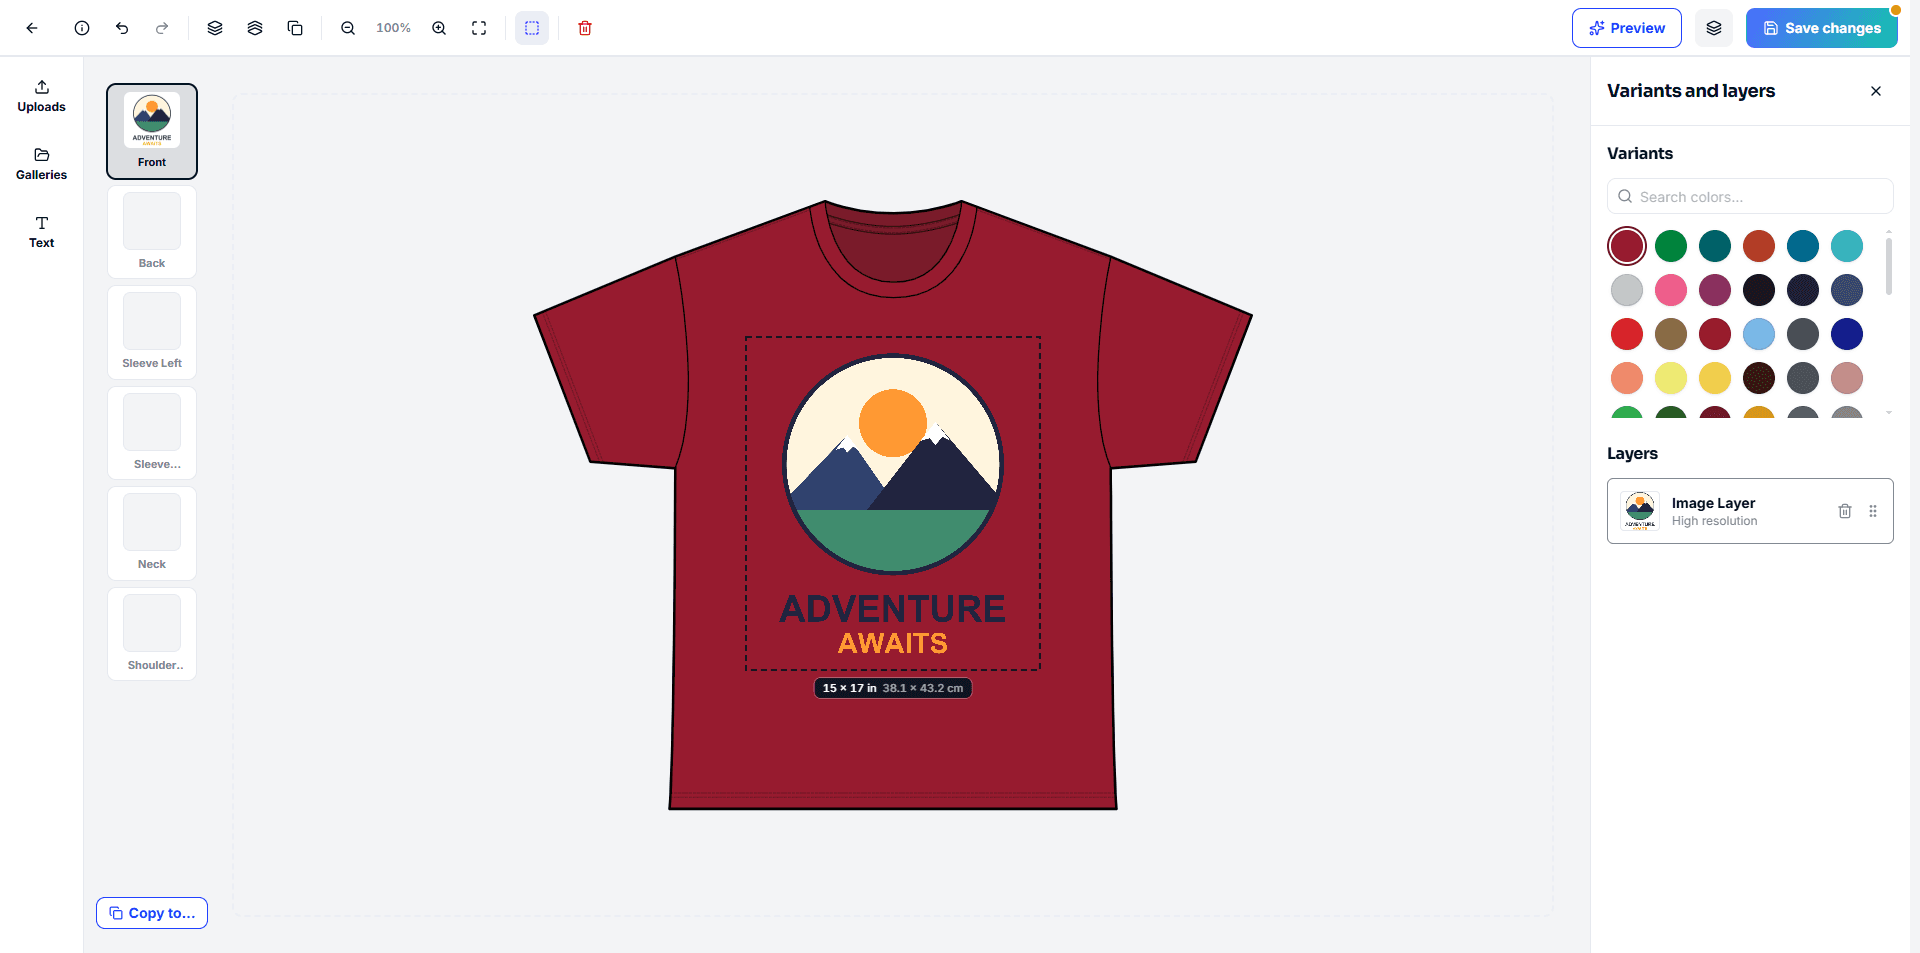
Right under the print frame you’ll see the print area size (e.g. 15 × 17 in · 38.1 × 43.2 cm). Scroll to zoom in or out; drag an empty spot on the canvas (or hold Space and drag) to move around. To crop an image: select it, click Crop image (the crop icon) in the toolbar, drag the frame, then click Apply crop.
⚠️ Your design image needs enough resolution (the system tells you the minimum size as soon as you upload) — images that are too blurry or small trigger a warning, and the print may look grainy.
When you’re done, click Save. The product is saved and appears in My Products.
Yoke printing (Shoulder Front / Shoulder Back)
Some shirt styles have an extra yoke print position — a wide strip running just below the collar, from one shoulder to the other: Shoulder Back on the back, Shoulder Front on the front. Only items that show this tab in the Product Editor can be printed on the yoke.
Because the print strip is very long and narrow, prepare your file at the size the factory recommends (300 DPI):
| Garment type | File size |
|---|---|
| T-shirt | 9450 × 2100 px |
| Sweatshirt / Hoodie | 10500 × 1650 px |
The real print area on the garment changes with the garment size — smaller sizes print narrower than larger ones. Keep the important content in the middle and away from the two ends of the file.
Design outside the print area (Special print area)
If your design sits outside the standard print area — for example placed low near the hem, or running onto the side seams — tick Special print area (+$3/item):
- In the Product Editor: open Product info → tick Special print area → Save.
- Or while you Map SKU a marketplace order: tick the box in the dialog before clicking Map / Remap.
The box only shows on products a factory can print this way. It is saved on the product, so every order of that product is printed as Special and costs $3 more per item. If a design goes outside the print area and the box isn’t ticked, the factory may put the order on hold — Inkica then turns it on for you, your wallet is charged the extra $3 per item and you get a notification.
Embroidered products (Embroidery)
Embroidered items (the design is stitched with thread, not printed) are in the Embroidery collection — on the Catalog page open the Technique filter → Embroidery (the Collection filter → Embroidery works too). Their names all include “Embroidered”.
- Embroidery positions:
- T-shirts are embroidered on the left chest or center chest (4 × 4 inch). Crewnecks/hoodies are embroidered on the left chest (4 × 4 inch) or with a large center chest design (12 × 10 inch), with optional Back (12 × 10 inch) and Left Wrist / Right Wrist — embroidery on the sleeve cuff, 2 × 3 inch each.
- Youth items (T-shirt, crewneck, hoodie) and the women’s micro rib baby tee and tanks: Front, optional Back, up to 6.5 × 7 inch per side. The spaghetti strap tank is Front only.
- Mineral Wash T-shirt: Front, optional Back, up to 9.7 × 9.7 inch per side.
- Dad Hat, Trucker and Baseball hats: embroidered on the front, up to 4.8 × 2.25 inch. Beanie: embroidered on the cuff, up to 5 × 2.5 inch. Keep hat designs simple, with at most 5 thread colors.
- Price: the item price already includes the first embroidery position; each extra position (back, each wrist) adds the fee shown on the detail page.
- Preparing the file:
- PNG at 300 DPI with a transparent background — every color in the file, white background included, is stitched.
- Keep lines and details thicker than 0.05 inch and text taller than 0.5 inch; smaller details are simplified when stitched.
- Thread colors only approximate your design colors; they won’t match exactly like print.
- An embroidered product still needs a design on Front or Back — a product with only wrist embroidery can’t be saved.
Journals
For journals (Spiral Journal, Hardcover Journal) you design the front cover only — the back cover stays white. On hardcover journals the outer edge of the frame wraps around the board, so keep text and important details away from the edges.
All-over-print items designed in 3D Studio
Some all-over-print blueprints (for example football jerseys) are designed directly on a 3D model with 3D Studio. For these blueprints the Product Editor opens 3D Studio straight away, and the product page has an extra New 3D design button (Open 3D design once a design exists), a 3D Studio project section and a Print files by size section.
- In the Catalog, open the blueprint and click Start designing. 3D Studio opens right inside Inkica: design each piece, then click Export to Inkica. Inkica renders every size and puts each print file straight into the product — nothing to download or upload by hand. (Save Project only saves your design to keep editing later.)
- Go to My Products → open the product page → under Print files by size you’ll see one file per size. These are the files sent to the factory when an order comes in. Closed the tab before the export finished? Click Import from 3D Studio there to fetch the latest export. Click Upload / Replace only if you want to swap a single size’s file yourself.
- A size without its own file uses the product’s shared print file (shown as Uses the shared AOP file).
- A product has 1 3D design. Click Open 3D design (or open the product in the Product Editor) to keep editing it — saving updates that same design. To delete it, click the trash icon under 3D Studio project — it is deleted in 3D Studio too and can’t be restored.
- If you need the 2D editor (for example when 3D Studio won’t open), click 2D editor at the top right of the 3D Studio screen.
- When you match a marketplace order SKU (Map SKU) to this product, each size automatically uses its own print file.
For jewelry products (necklaces, bracelets, earrings…)
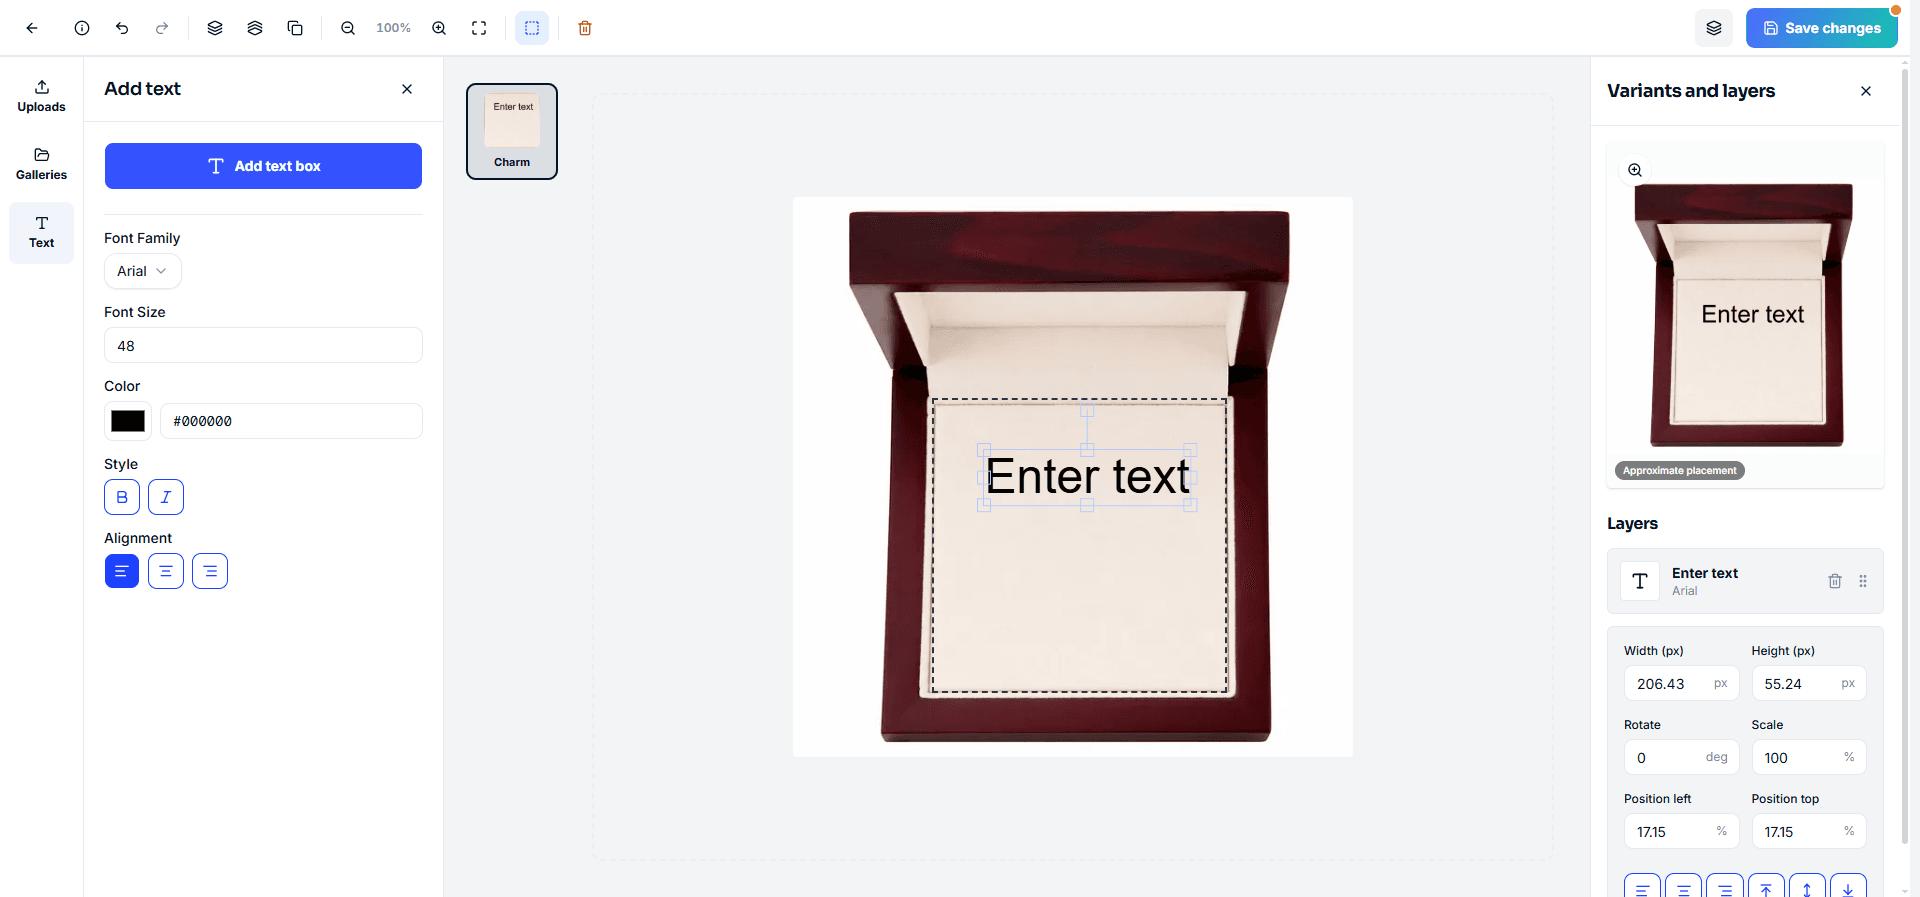
Jewelry doesn’t have “print positions” like shirts or hats — it has just 1 area called Charm: a small card included in the gift box, printed with a name or message as your customer requests (for example an engraved name or an anniversary date). On the Charm tab, use Text to type directly onto the card — you can adjust the font, size, color, bold/italic and alignment — or Uploads/Galleries if you want to use an image instead of text.
💡 If every order needs different engraved text (a different customer name each time), you don’t need to create many separate products — create 1 charm product and leave it blank, then edit the text right in the order details when a real order comes in (see Process orders).
Create many products at once (Create products)
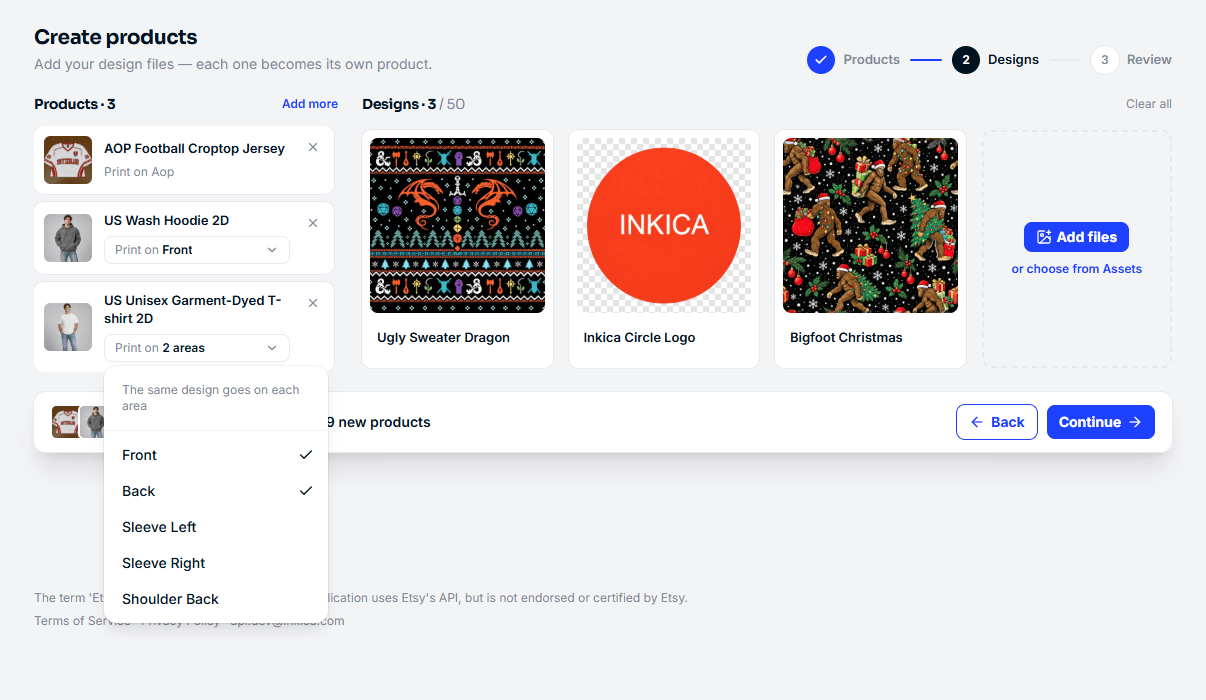
When you have many designs to put on many items — for example 10 designs × 3 shirt styles = 30 products — you don’t need to open the Product Editor for each one. Go to My Products, click Create products (top right corner) and go through 3 steps:
- Products — pick the items you want to use. The list is identical to the Catalog page (categories, collections, search, filters). Click a card to select/deselect it, or click Select this page to select everything on the current page.
- Designs — add design images: drag and drop them into the box, click Select files, or use Choose from Assets to pick images already in your Image library. PNG or JPG, up to 50MB per image, up to 50 designs at a time.
- The text box under each image is the product name (by default taken from the file name) — edit it right there. If you select several items, the system automatically appends the item name so product names don’t clash, for example
Bigfoot Christmas - US Wash Hoodie 2D. - Each selected item has a Print on box for choosing print positions. You can choose several positions (for example Front + Back) — the same design is printed at every position you choose.
- No design yet? Click Skip designs to create empty draft products, then finish each one in the Product Editor later.
- The text box under each image is the product name (by default taken from the file name) — edit it right there. If you select several items, the system automatically appends the item name so product names don’t clash, for example
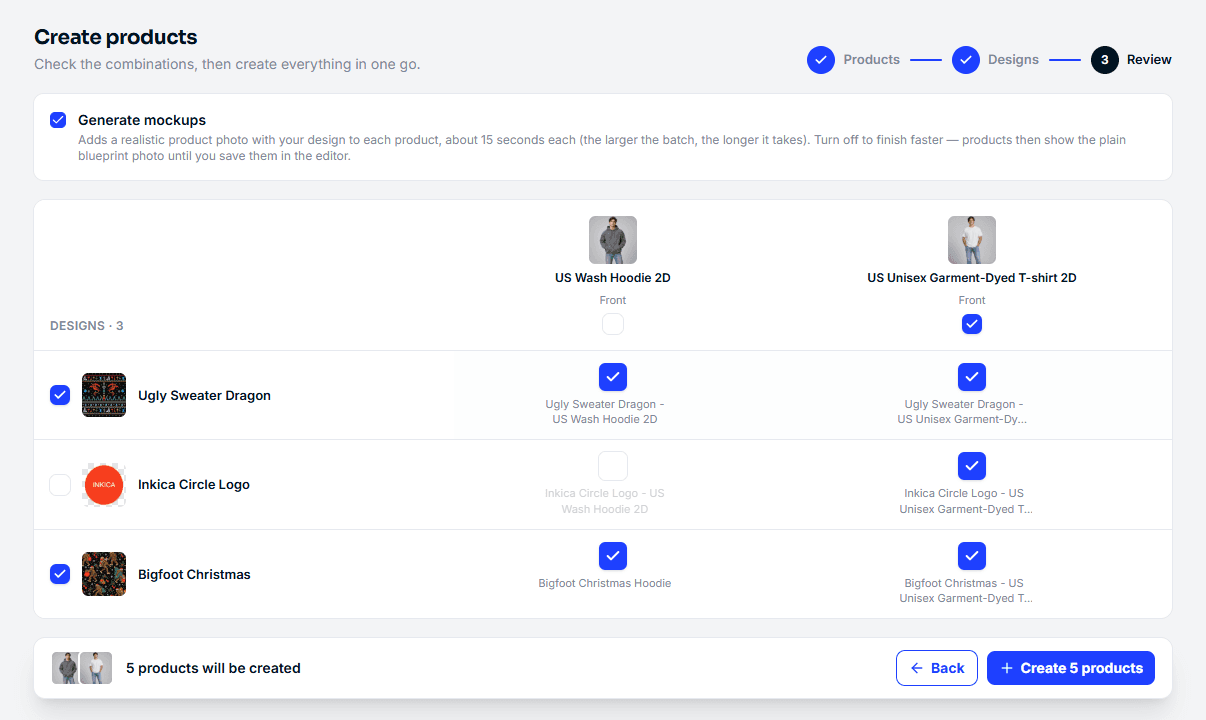
- Review — a summary grid: each column is an item, each row is a design, and each cell is a product that will be created. Untick the cells you don’t need; the checkbox at the top of a column or the start of a row turns a whole item or design on or off in one click. Below each cell is the product name that will be created — click the name to change it for that product only (Enter to save, Esc to cancel, clear it to go back to the automatic name). Click Create N products to create them.
Things to know when creating in bulk:
- Up to 200 products at a time. If you select more, the create button is locked with a message — untick some, create this batch, then run another batch for the rest.
- Keep the tab open while creating — if you close the tab midway, the products that haven’t been processed yet won’t be created. The bottom bar shows progress (Creating 12/30).
- Images are used to fill the print area exactly, without the automatic positioning/scaling you get when dragging in the Product Editor — so prepare files with the right aspect ratio and enough resolution for the print position. To adjust the position, open the product with Edit after it’s created.
- Generate mockups (on by default) creates real mockup images for each product, taking about 15 seconds per product. Turn it off to create faster — the products then temporarily use a plain blank-item image.
- A mockup is required when placing an order. Any position that has a design but no mockup yet shows a Mockup box with a yellow border in My Products — click it to upload a mockup, or open Edit and then Save to let the system generate one.
- Failed products show a red icon in the Review table — hover over it to see the reason (most commonly: the image doesn’t have enough resolution — the product is still saved as a draft but without a design attached). Fix the cause, then click Retry — products that were already created successfully are not created twice.
- Jewelry can also be created in bulk: the design is attached to the Charm area (the card included in the box). To add text to the card, open the product with Edit after it’s created.
Manage the products you’ve created (My Products)
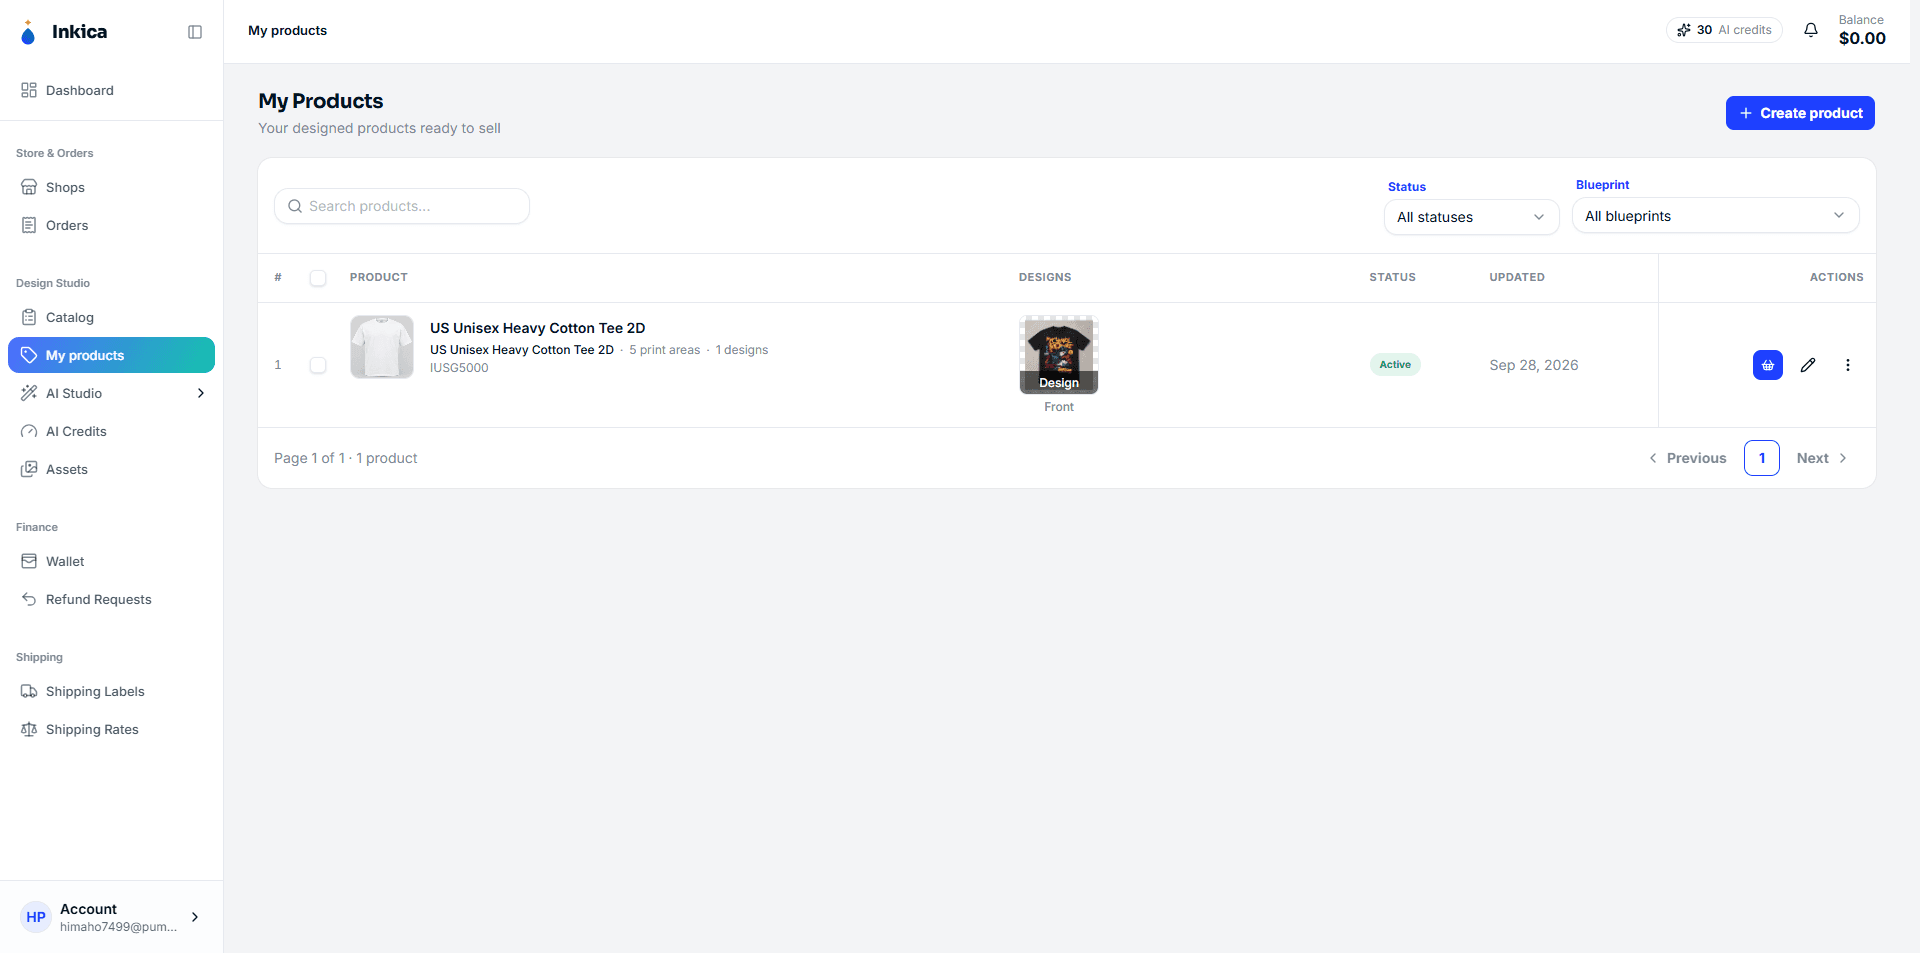
Go to My Products to see all the products you’ve created. For each product you can do the things below — Make order and Edit are buttons right on the product row, you rename with the pencil icon next to the name, and the ⋮ menu holds List to marketplaces, Duplicate, Delete:
- Edit — change the design.
- Rename — change the display name.
- Duplicate — copy it into a new product (handy when you want to change one small detail and keep everything else).
- Edit designs (quick-edit dialog) — quickly replace the design/mockup image at each print position without reopening the full Product Editor. Handy when you only need to swap one image file (for example a design with a typo) and don’t need to readjust its position/size.
- Make order — create an order straight from this product.
- List to marketplaces — available only when the product is active (Active/Published) and has at least 1 image (design or mockup); otherwise it shows This product can’t be listed yet. It opens the page to list this product as a new listing, at the same time on several of your connected eBay/Etsy/TikTok Shop shops. See List products to marketplaces.
- Delete — delete the product (a product that is already in an order can’t be deleted).
⚠️ Listing on eBay goes live immediately — there’s no draft — unlike TikTok Shop/Etsy (which save a draft first, and you publish it yourself later), choosing eBay in List to marketplaces makes the listing publicly visible and ready to sell right away, with a real listing fee from eBay. When there’s an eBay shop (or you turn on publish-immediately for TikTok Shop/Etsy), the system asks for a final confirmation and lists the shops that will go live — check carefully before you click Publish now.
Tick the box at the start of each row to select several products — products in any status can be selected, drafts (Draft) included; the box at the top of the table selects the whole page. The bar at the bottom of the screen has:
- Delete — delete in bulk. If some products can’t be deleted (for example, they are already in an order), you see how many and why, and they stay selected.
- Make order — create one combined order, using only the active products (Active/Published) among those selected.
Product details page
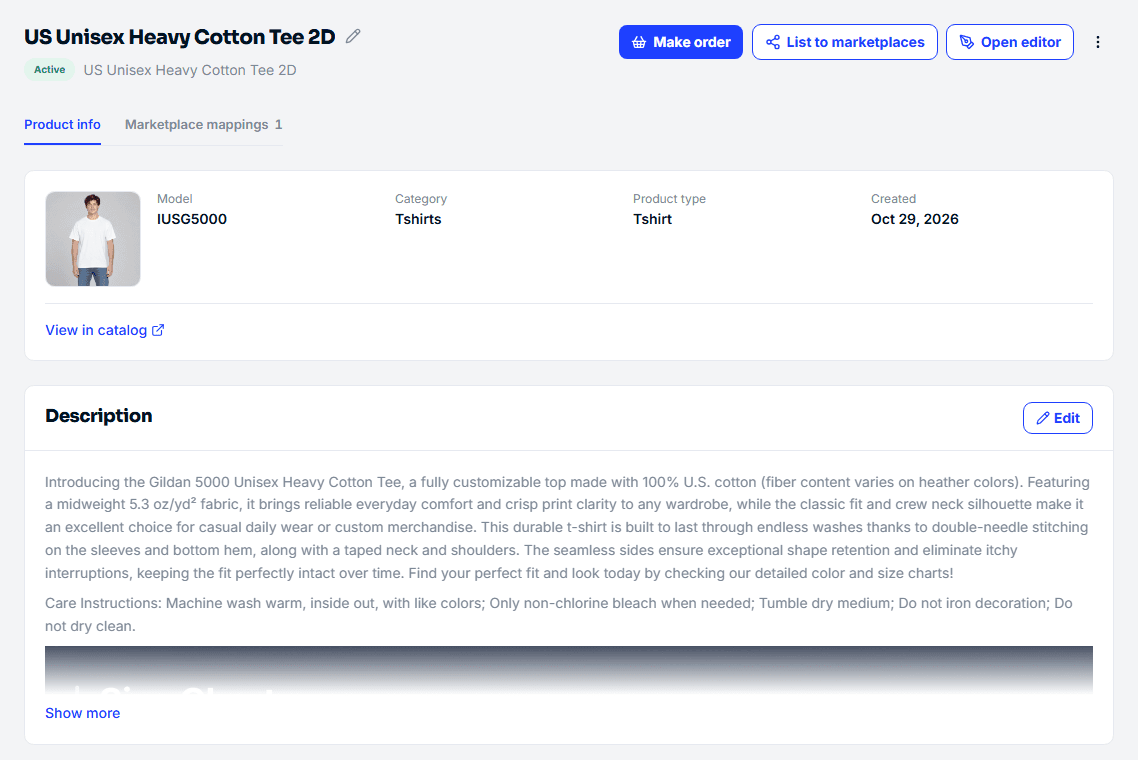
Click a row in My Products to open that product’s details page. At the top are the name, status, the item in use, and the Make order, List to marketplaces and Open editor buttons (opens the Product Editor so you can change the design), plus the ⋮ menu (Duplicate, Delete). List to marketplaces is greyed out while the product can’t be listed yet — hover over it to see why (the product isn’t active yet, or it has no mockup). The page has 2 tabs (the open tab is kept in the page link, so reloading or sharing the link opens the same tab):
- Product info — item info, description, designs, colors/sizes and selling price.
- Marketplace mappings — the marketplace SKUs currently matched to this product. The number next to the tab name is how many SKUs are matched.
Rename, description, designs
- Rename: click the pencil icon next to the name → type the new name → Enter (or click outside). Esc to cancel. A character counter under the box turns orange when the name is longer than a marketplace’s title limit (eBay 80, Etsy 140, TikTok Shop 255 characters) — the listing title starts from this name when you list the product.
- Description: click Edit to change the description, then click Done. This description is used as the listing description when you list the product on a marketplace. Long descriptions are collapsed — click Show more to read all of it.
- Designs & mockups: see the Catalog sample image along with the design and mockup of each print position, and click an image to enlarge it. Click Edit designs to quickly replace the design/mockup image without opening the Product Editor. Print positions without a design are grouped in the Add print position tile — click it and pick a position to open the Product Editor right at that position.
Choose colors, sizes and set selling prices (Variants & pricing)
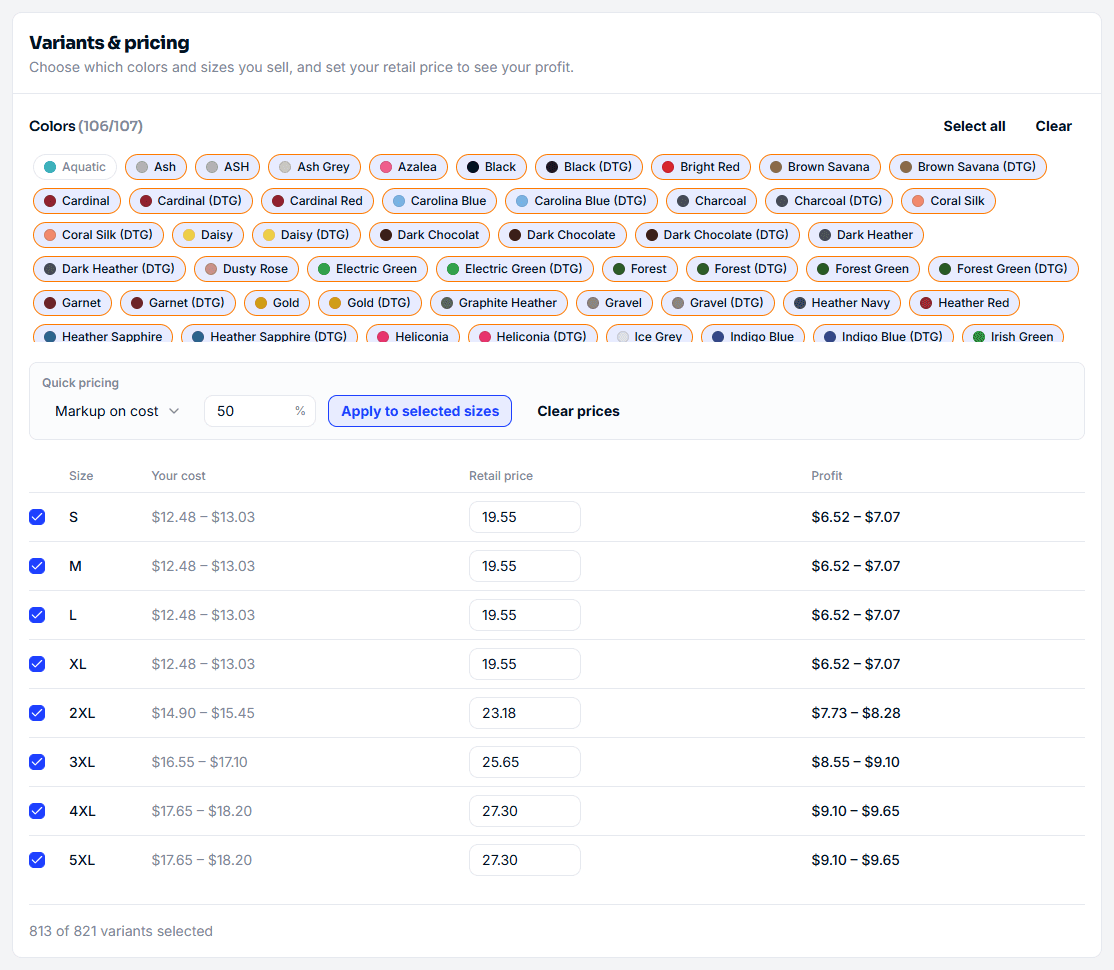
Choose the colors/sizes you want to sell and set a retail price to preview your profit:
-
Colors — click a color to turn it on/off, or use Select all / Clear to select or deselect everything.
-
The size table — tick/untick each size. Each size has:
- Your cost — Inkica’s base cost (a low–high range across the selected colors, since each color can have a different price).
- Retail price — the price you sell to customers. Enter a positive number with up to 2 decimal places.
- Profit — profit per item, shown in red if you’d sell at a loss.
-
Quick pricing — fill in prices for every selected size in one click. Choose a method, edit the number, then click Apply to selected sizes:
- Markup on cost — cost + N% (default 50%).
- Profit per item — cost + $N (default $10).
- Fixed price — the same price for every size (default $20).
The price is calculated from the most expensive selected color for that size, so you don’t lose money on any color. Clear prices removes all the prices you entered.
If nothing is selected on a product, it defaults to selling every color and size of the item. You can also open this section from the Product Editor with the Variants & pricing button.
💡 The colors/sizes and selling prices you choose here are exactly what gets listed when you use List to marketplaces. They don’t apply when you create an order.
Save changes
When you change the name, description, or colors/sizes/prices, an Unsaved changes bar appears at the bottom of the screen — click Save to save everything at once, or Discard to drop the changes. If you leave the page without saving, your browser asks you to confirm first.
Marketplace mappings tab
Lists every marketplace SKU — across all your shops — currently matched to this product, split into tabs by marketplace: shop, marketplace SKU, size · color, and the number of active orders. Click the unlink icon at the end of a row to unmatch a SKU (new orders for that SKU will need to be matched again). To create a new match or switch the product for a SKU, go to the shop’s Mappings tab — see View & edit matched SKUs.
List products to marketplaces (List to marketplaces)
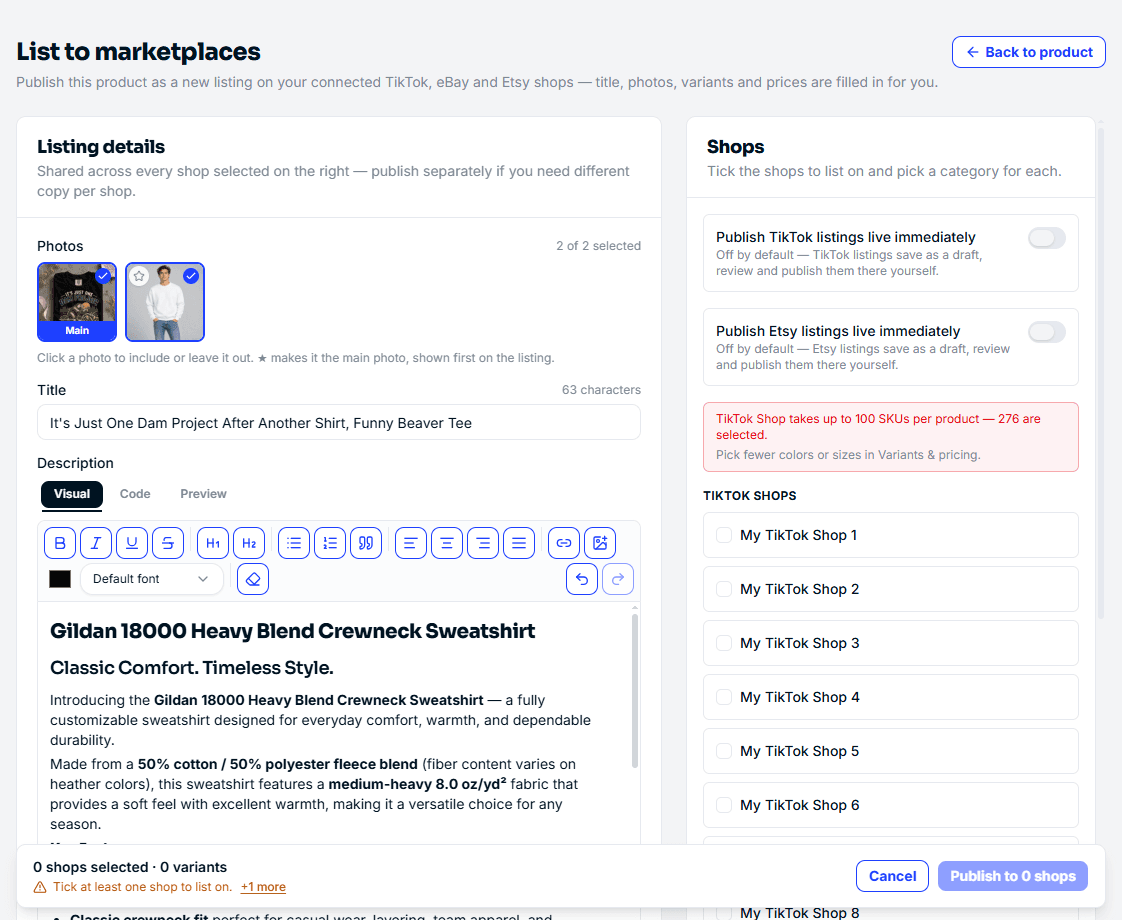
Click List to marketplaces on the product details page, or open the product’s ⋮ menu in My Products → List to marketplaces. The listing page has 3 sections, plus a summary bar at the bottom of the screen.
Listing details
- Photos — click a photo to add it to or remove it from the listing; click ★ to make it the main photo (shown first on the marketplace). Each marketplace accepts at most: TikTok Shop 9, Etsy 20, eBay 24 photos. A product without a mockup shows a warning — create a mockup before listing so customers can see the printed shirt.
- Title — has a character counter based on the limit of the selected marketplace: eBay 80, Etsy 140, TikTok Shop 255 characters.
- Description — rich-text editing (Visual / Code / Preview). A description is required to list (if it’s missing, you’ll see Add a description).
The title, description and photos you choose here are used only for this listing and don’t change the original product.
Variants & pricing
Identical to Choose colors, sizes and set selling prices on the product page — editing here saves to the product (click Save variants). Below it, the What will be listed card tells you how many variants, colors and sizes will be listed:
- Every variant needs a retail price — use Quick pricing to fill them in quickly.
- For items with both DTF and DTG prints in the same size/color: only the cheaper version is listed.
- Quantity per variant — the stock quantity declared for each variant (default 999).
Shops
Tick the shops you want to list on and choose a category for each shop. When you choose a category for one shop, the other ticked shops on the same marketplace are filled in to match — change each shop again if you need to. For eBay you also choose the item condition; Etsy needs a Production partner (why) and the shop’s shipping profile.
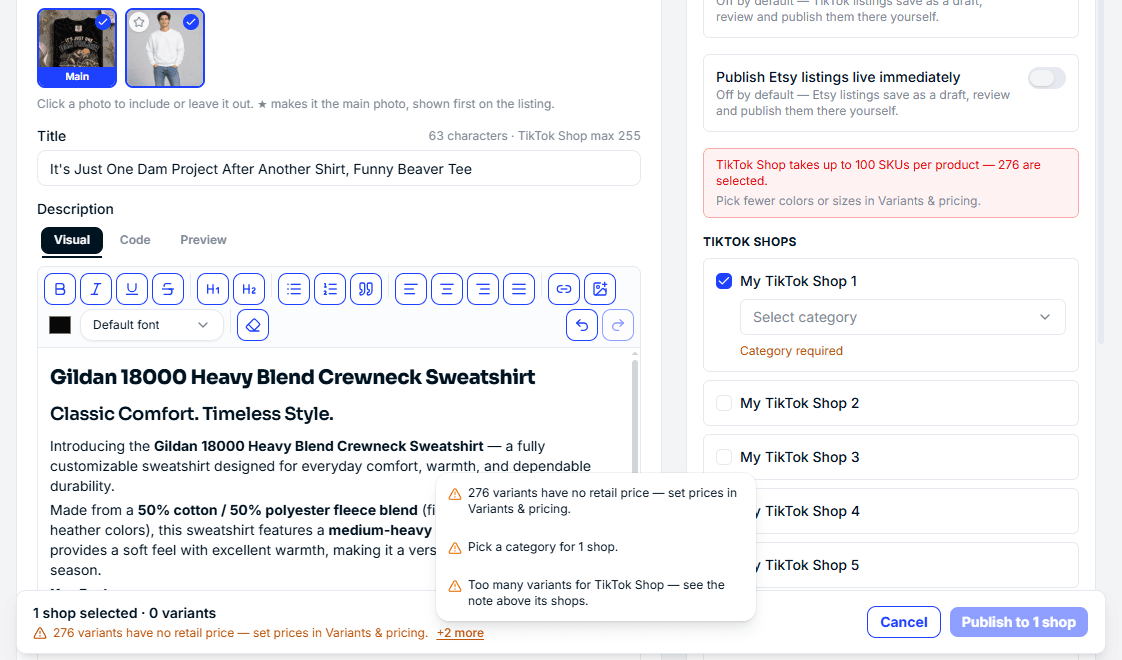
Each marketplace’s limits are checked immediately: TikTok Shop allows at most 100 SKUs per product; eBay allows at most 250 variations and 30 colors (or 30 sizes) per listing. If you go over, a red box appears right on that marketplace’s shop list — reduce the colors/sizes in Variants & pricing.
Publish
The bar at the bottom of the screen says exactly what’s still missing (for example no category chosen, a title too long for eBay, or variants without a price); once everything is in place it shows Ready to publish. By default TikTok Shop and Etsy save a draft — turn on Publish … listings live immediately if you want to go live right away. While publishing, stay on the page until you get the result.
After publishing, the page shows the result for each shop with a link to open the listing. The new listing’s SKUs are automatically matched to the product, so incoming orders already know what to print — only multi-variation eBay listings may need matching a product on the first order of each size/color.
Etsy currently accepts a listing with a single price (the lowest price) — customers can’t yet choose a size/color on Etsy.