3. Process orders
How do orders get into the system?
- Automatically from marketplaces (most common) — once you’ve connected your shop, orders flow into Inkica as soon as customers buy on the marketplace. You don’t need to do anything.
- Create them by hand — go to Create Order and work through 4 steps: Products (pick products you’ve already created) → Shipping (customer address, shipping method) → Review → Payment, then click Pay.
- Import many orders at once with an Excel file — see the details below.
Orders shipping to the US can use fast shipping (Priority/Express) — see Fast shipping.
💰 Money is only deducted when you click Pay (orders created by hand), click Fulfill (marketplace orders), or finish an import — you pay nothing before that. If the order is canceled later, the money is automatically refunded to your wallet.
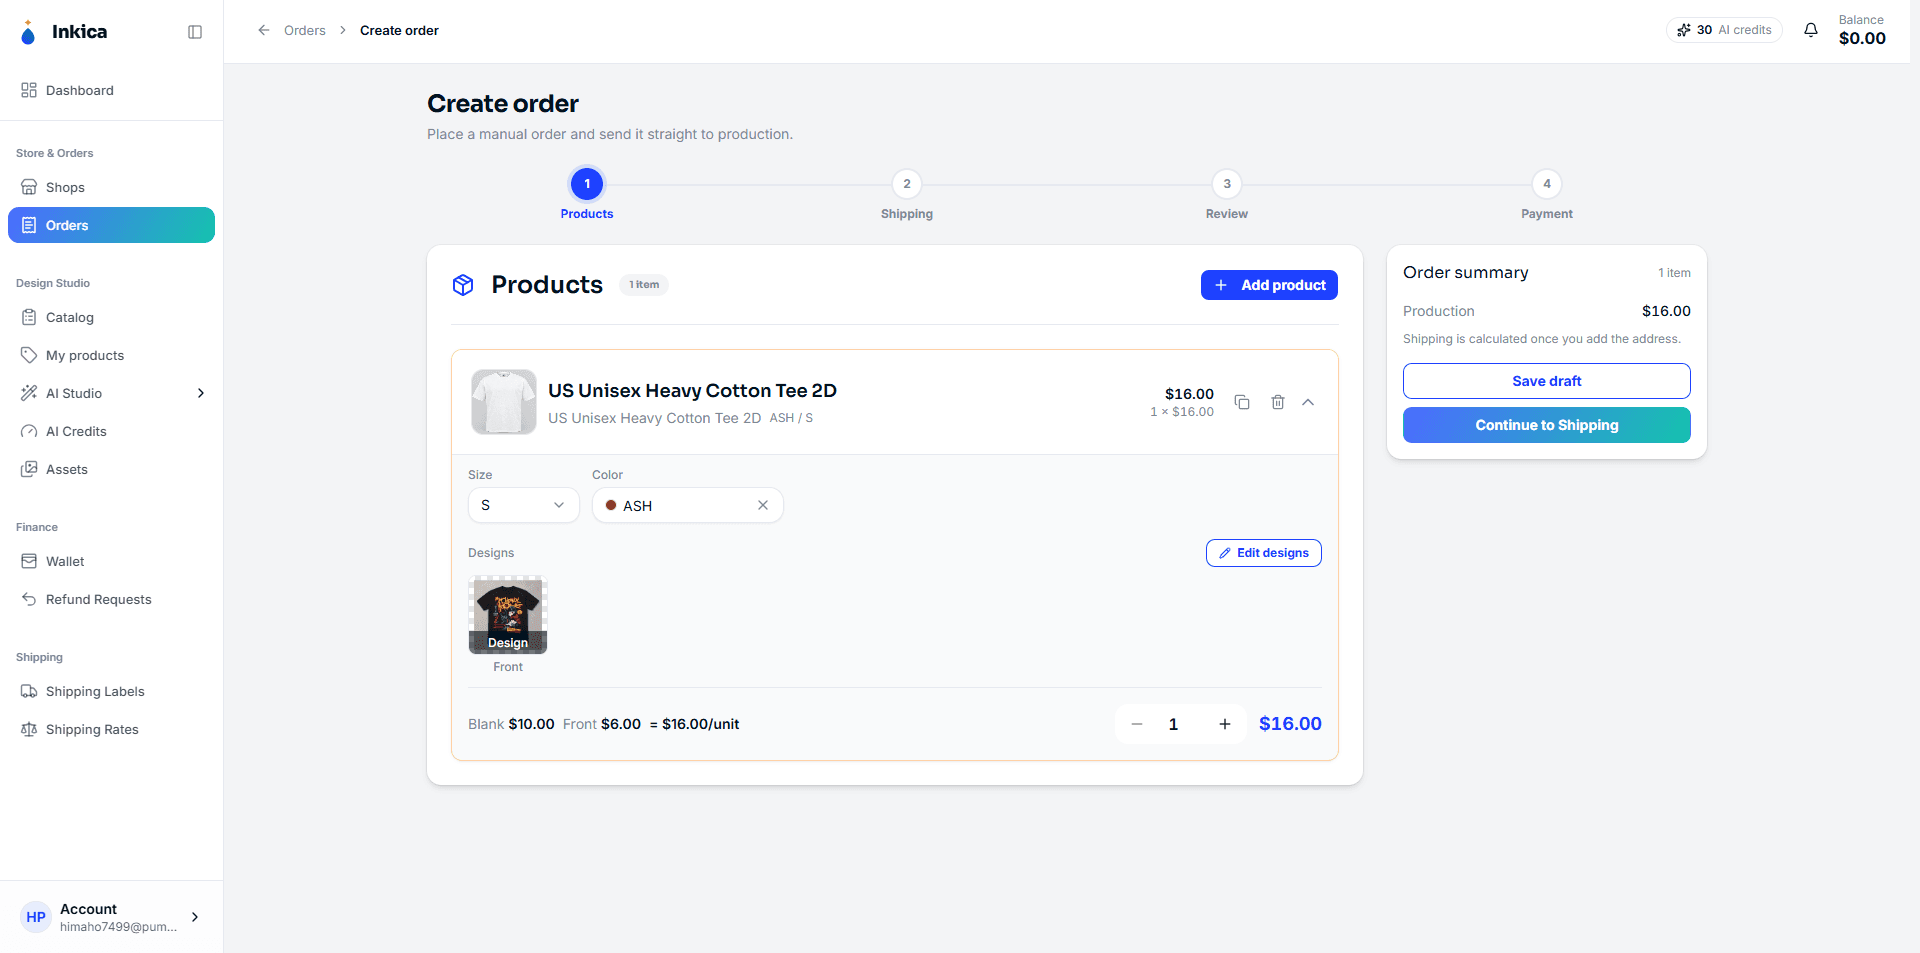
Save a draft & come back later
If you’re creating an order by hand and aren’t finished, you can click Save draft at any step — the order is saved, nothing is charged, and nothing is sent anywhere.
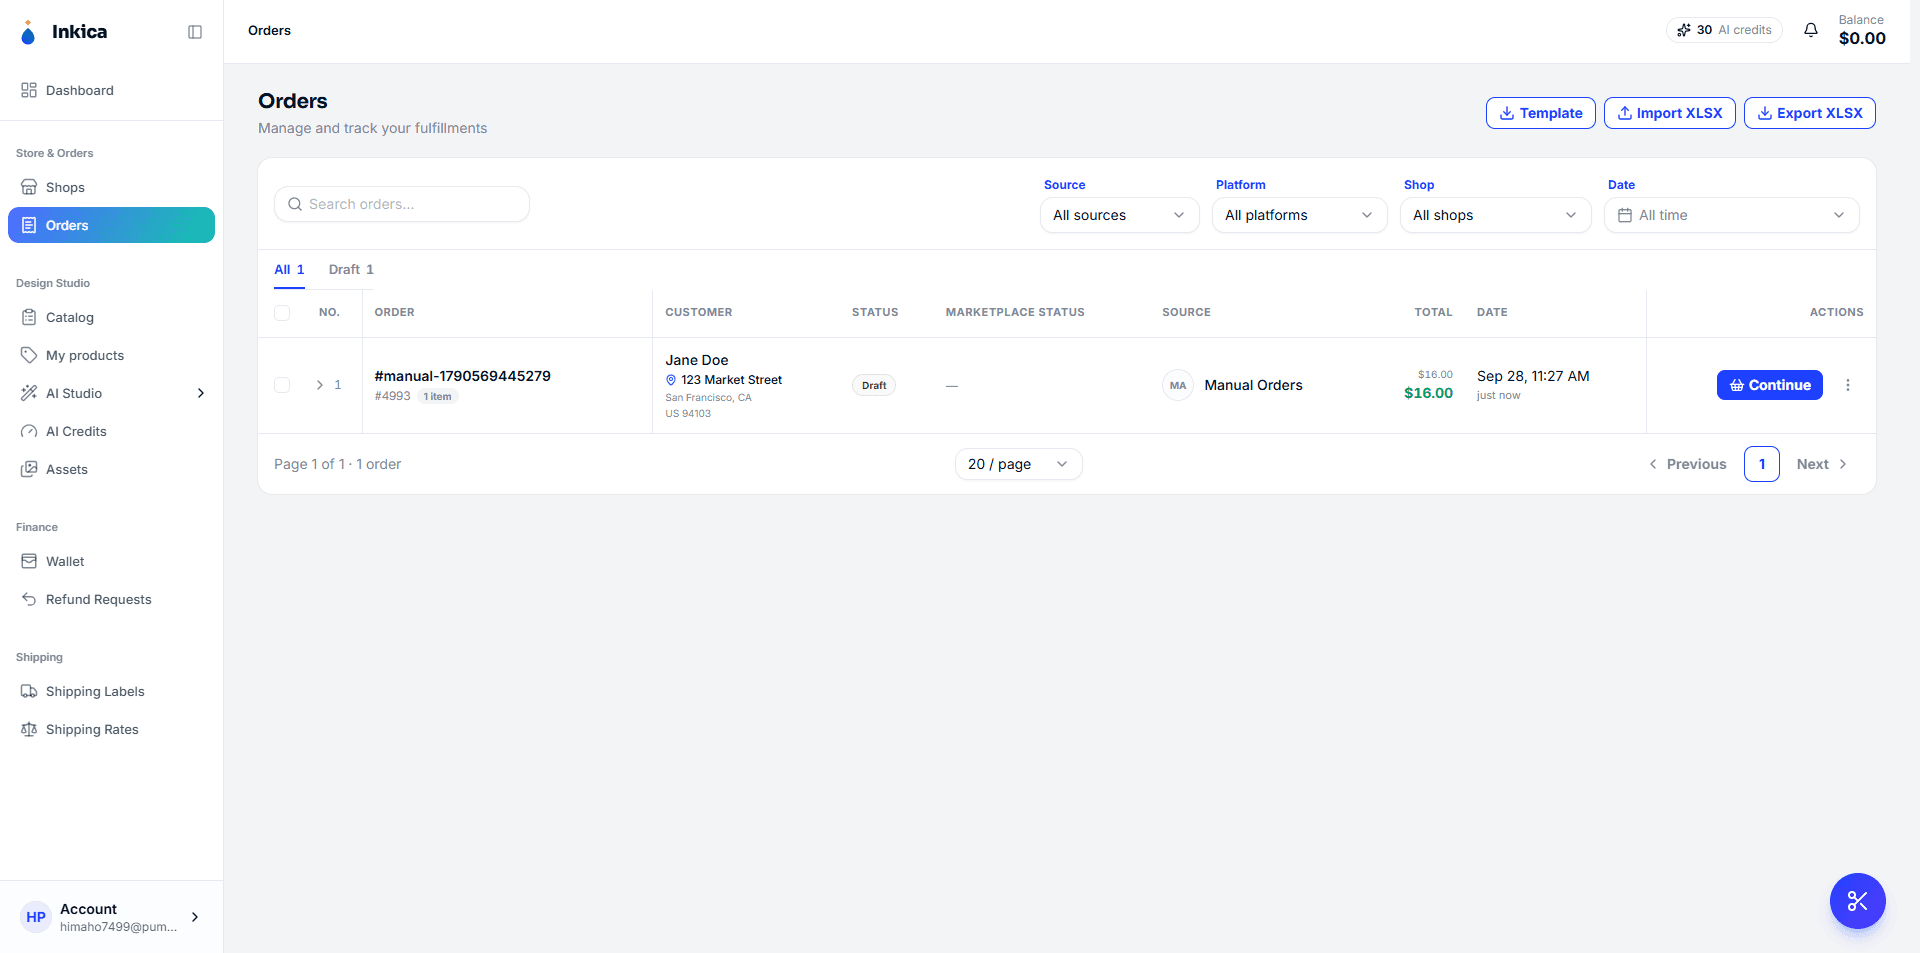
Draft orders appear in the Orders list with a Draft label. Click the order → Continue to keep editing, or Delete draft if you no longer need it.
Choose print positions for each line & see the price
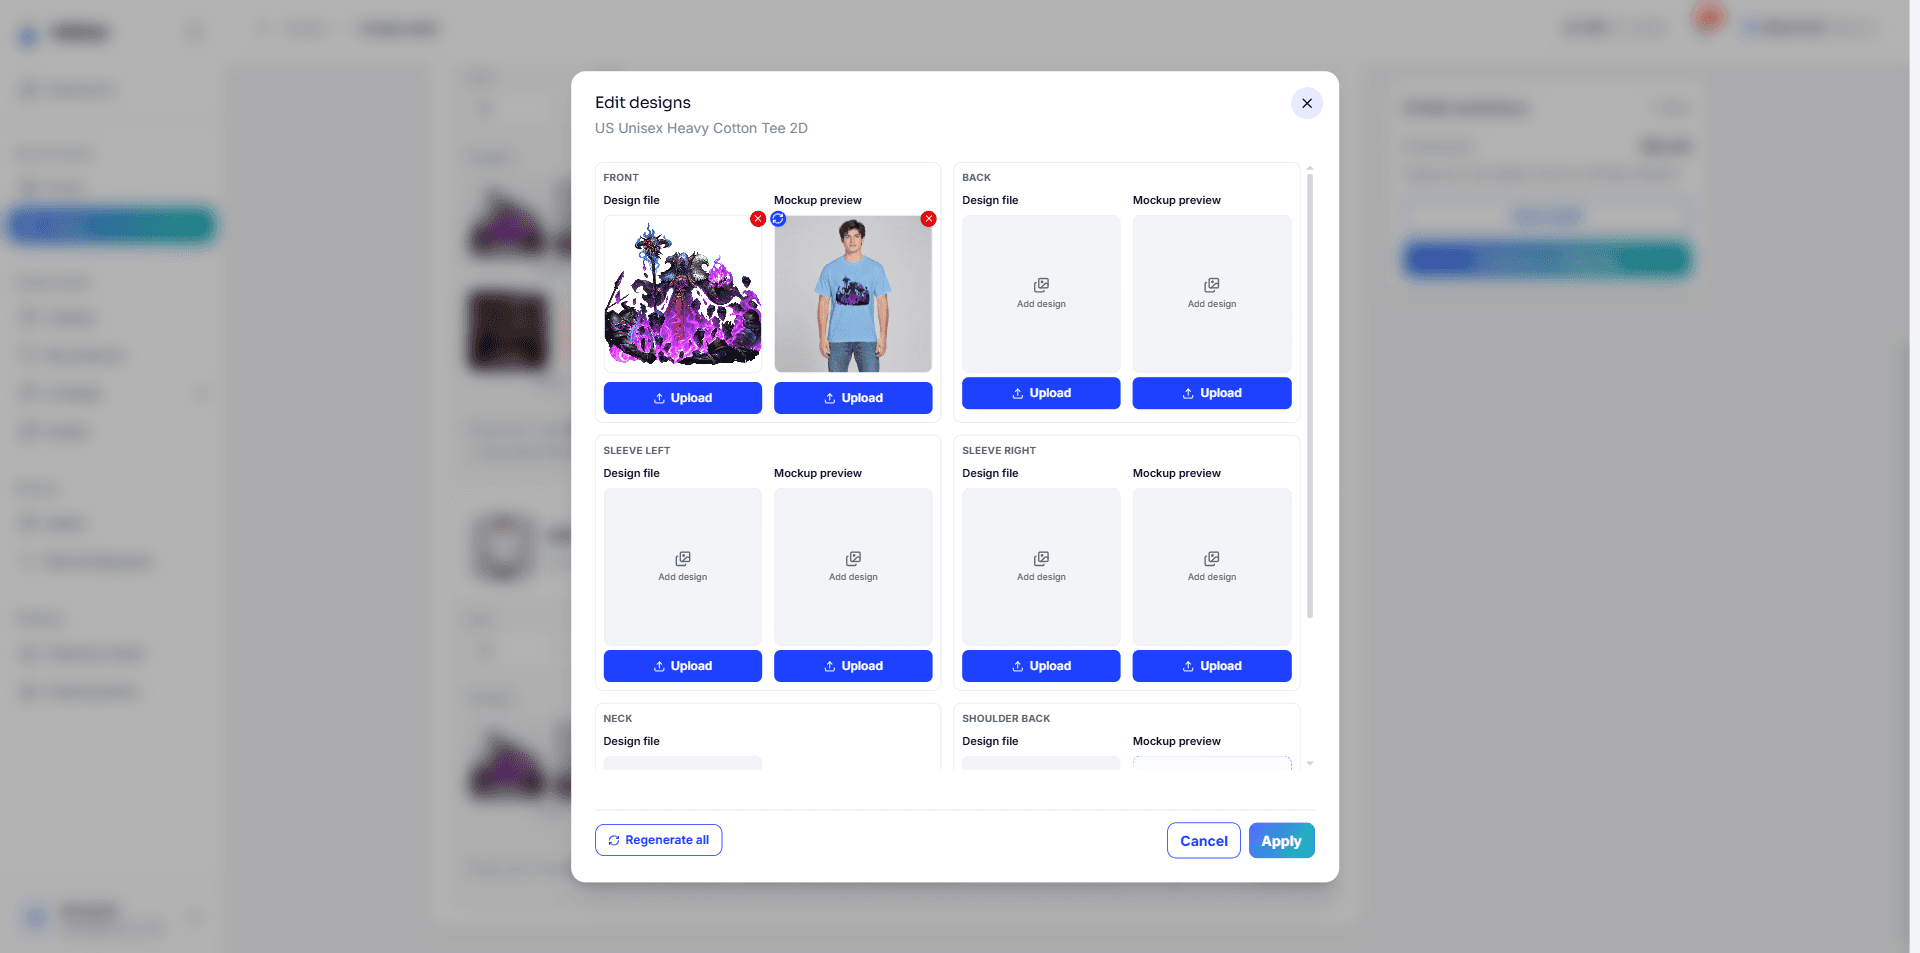
Every product you add to an order comes with that product’s design images. To print something different for this order only (for example, front only, no sleeves), click Edit designs on that line:
- Click Upload to replace the image in a position, or click the red × on an image to remove that position → Apply.
- A removed position is not printed and not charged.
- Need the same product printed in different ways (for example one shirt with the front only, another with front + back)? Click Duplicate item to copy the line, then edit each line separately.
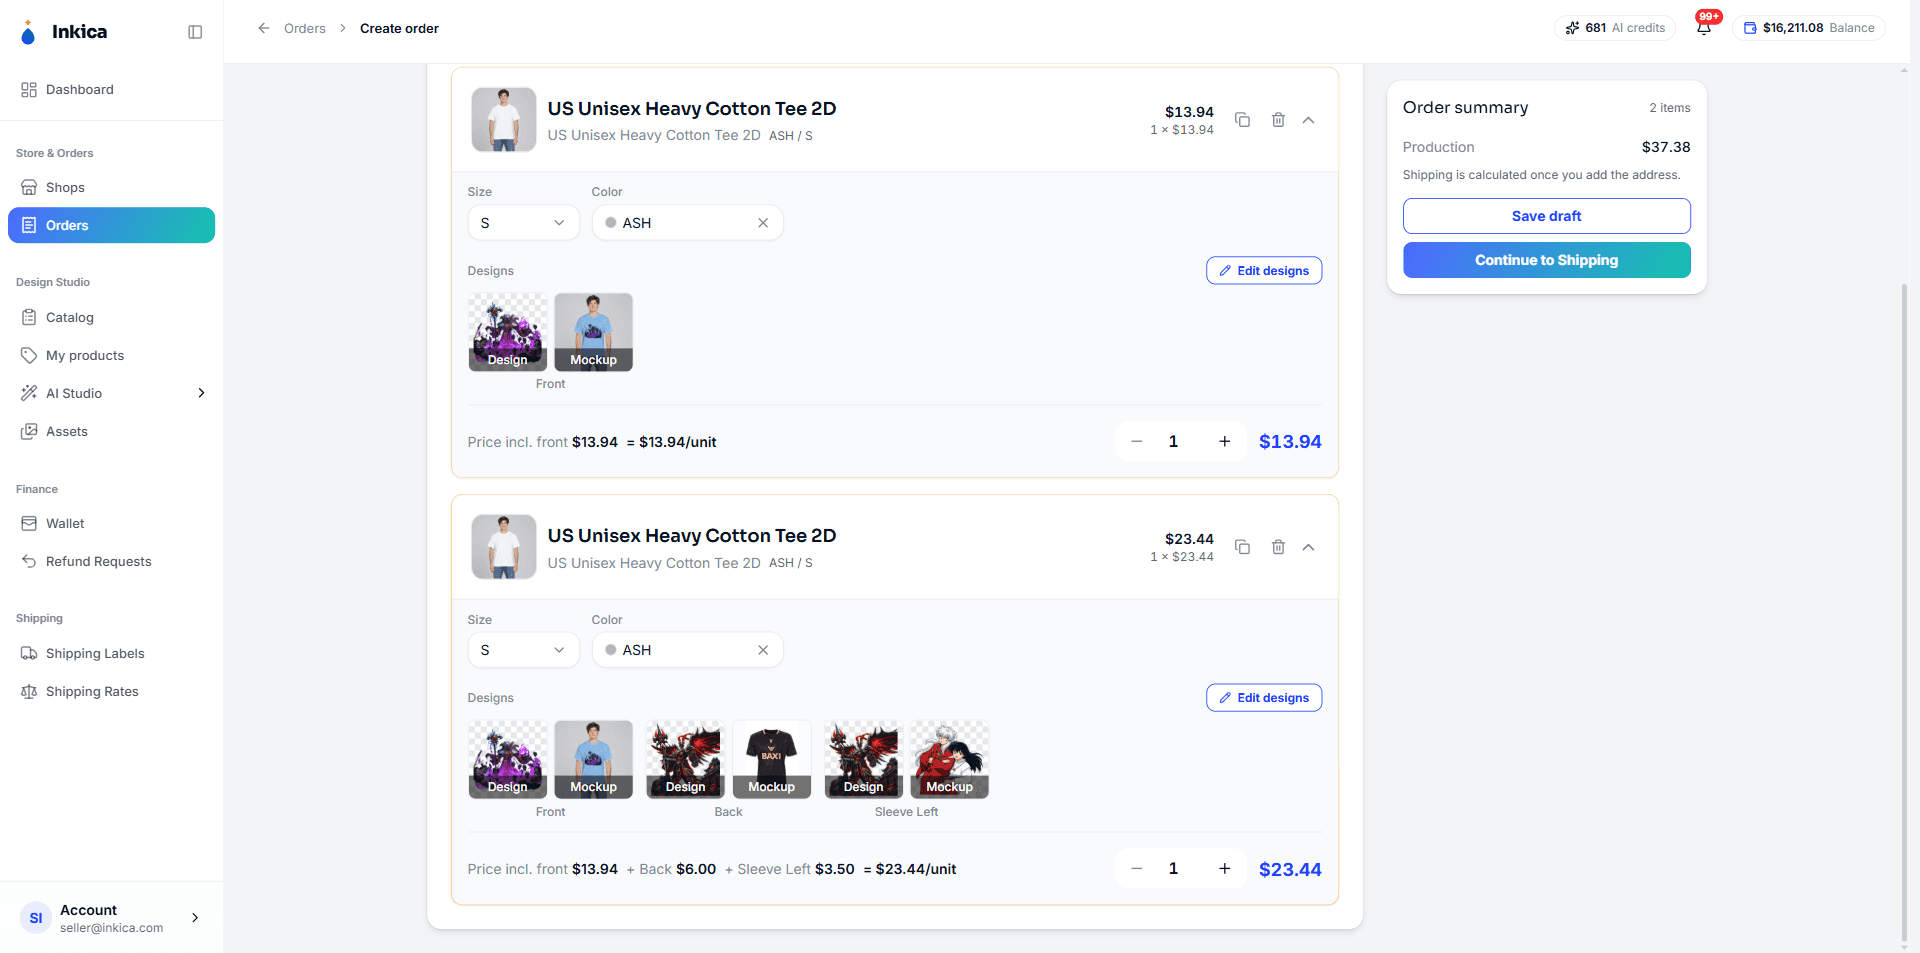
Right under each line there’s a price breakdown, for example “Price incl. front $14.00 + Back $6.00 = $20.00/unit” — the price includes one print, plus a fee for each additional print position (see How pricing works). The amount at the Payment step equals the sum of all lines plus shipping — and that’s also the amount deducted from your wallet.
⚠️ Shirts/hoodies need a design image on the front or back (sleeves alone aren’t enough), and for shoulder printing there must be a design on the matching side (a back shoulder needs a back design). If something is missing, the system shows an error when you click Pay — you haven’t been charged, so go back to Edit designs to fix it.
One order pays only one shipping fee
If the products in an order are made by different factories, the system automatically splits it into several packages (the order ID gets a suffix such as -F1, -F2…). Before you pay, you see a Ships in N packages notice (both when creating by hand and at the Excel preview step): the customer receives N packages, each with its own tracking number, and you see each package as its own order (the list and order details show a Package i of N label). Even so, you pay just 1 shipping fee, as shown at the Payment step, and that fee is divided among the packages; the amounts add up exactly to what you paid. Self-ship orders and TikTok orders shipped by TikTok (TSS) are never split.
Import many orders with Excel
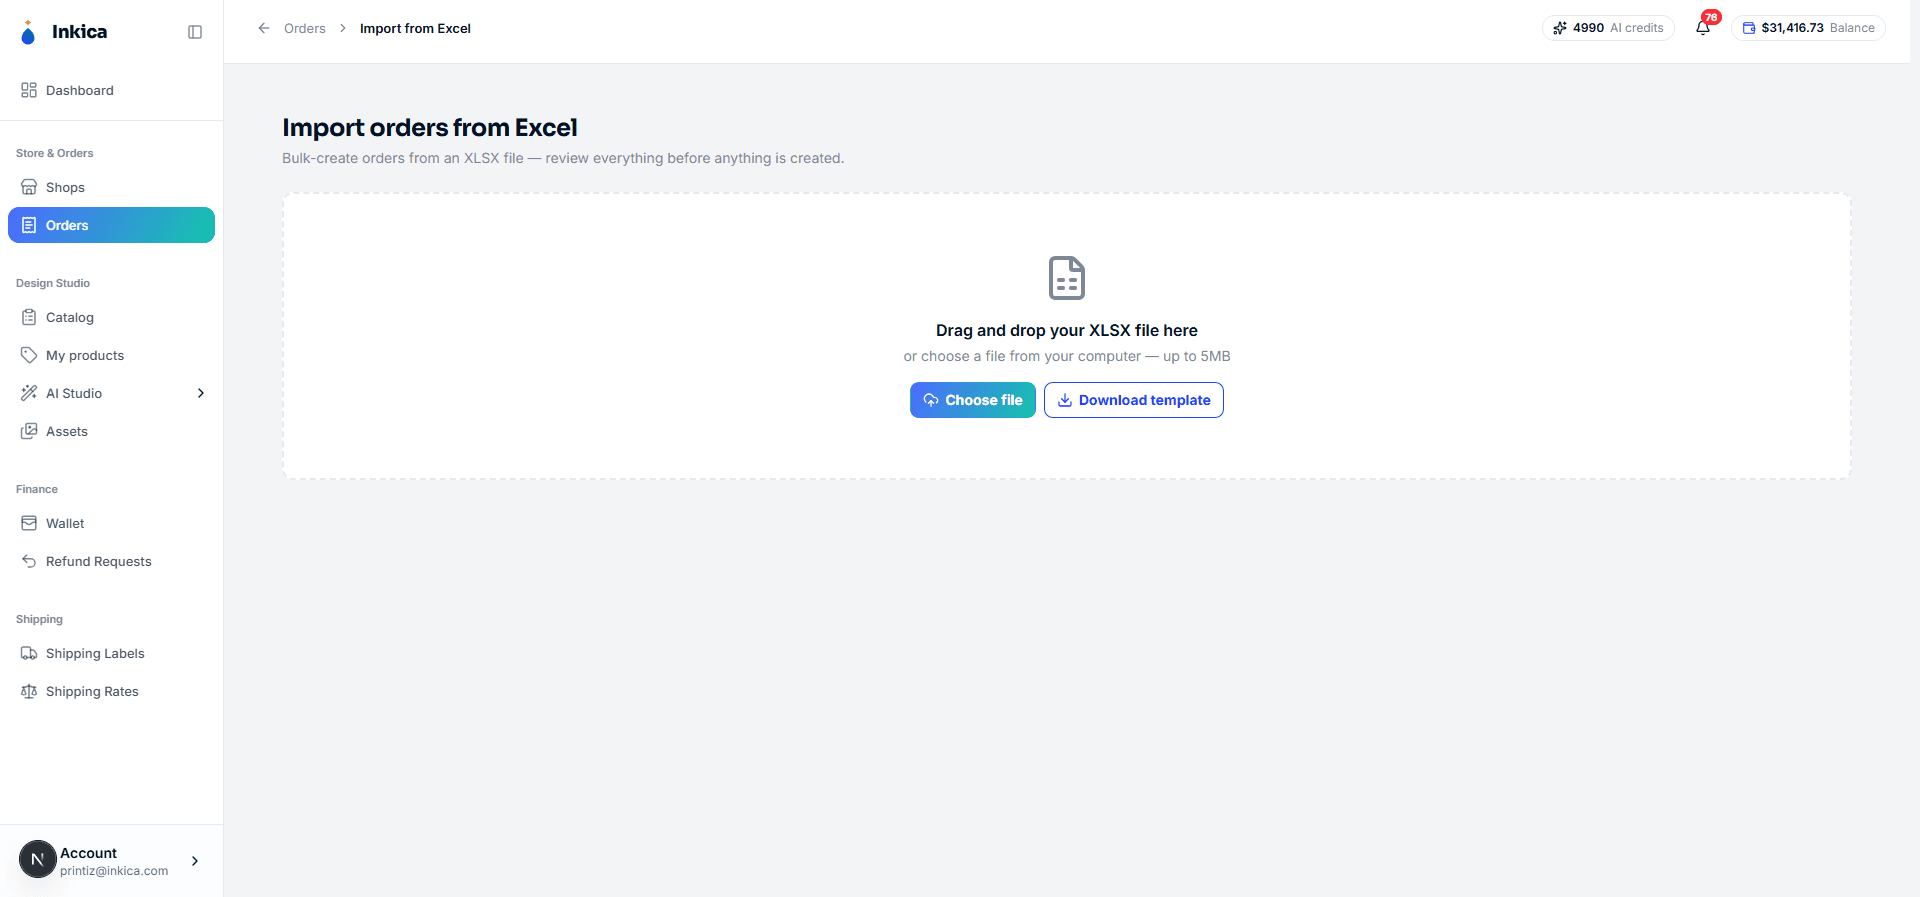
In the Orders list, click Import XLSX — it opens a dedicated Import orders from Excel page (no longer a popup). Previewing, fixing errors, and adding/removing products are all done right on this page, with no need to re-upload the file after each fix.
Step 1 — Prepare your file
Each row in the file is one product of one order (for an order with several products, repeat the order ID on several rows). Required columns: order_id, sku, quantity, customer_name, customer_phone, address1, city, state, zip. If you don’t have a sample file yet, click Download template on the Import page to get the exact column names and an example row.
- sku must be Inkica’s internal product code (find it in the Catalog or in a product you’ve created) — not the product code on the marketplace.
- Each row needs at least 1 design image (
design_front,design_back,design_sleeve_l… — enter the image URL). If all are missing, the order is blocked; see “Missing design” below. - You can also fill in
mockup_front,mockup_back… if you already have finished mockup images you want to send along. For products where the system can’t generate a mockup itself (for example jewelry), you must fill in the mockup column for each position that has a design, otherwise that row shows the error design without a mockup. - Image links (design/mockup) must point straight to the image file — share-page links (Google Drive, Dropbox…) trigger a warning. A link to an image on Inkica’s CDN whose file has been deleted blocks the import; an Inkica CDN link whose image isn’t in your Assets library only triggers a warning.
- File limits: only
.xlsx, up to 5MB, 500 orders (2000 rows) per import;quantityfrom 1 to 999. An order_id containing accents/non-ASCII characters is an error; one containing spaces is a warning. - State/province column: for US orders, either the 2-letter code (
NY) or the full name (New York) works — the system converts it to the code.
Step 2 — Upload the file and see results right away
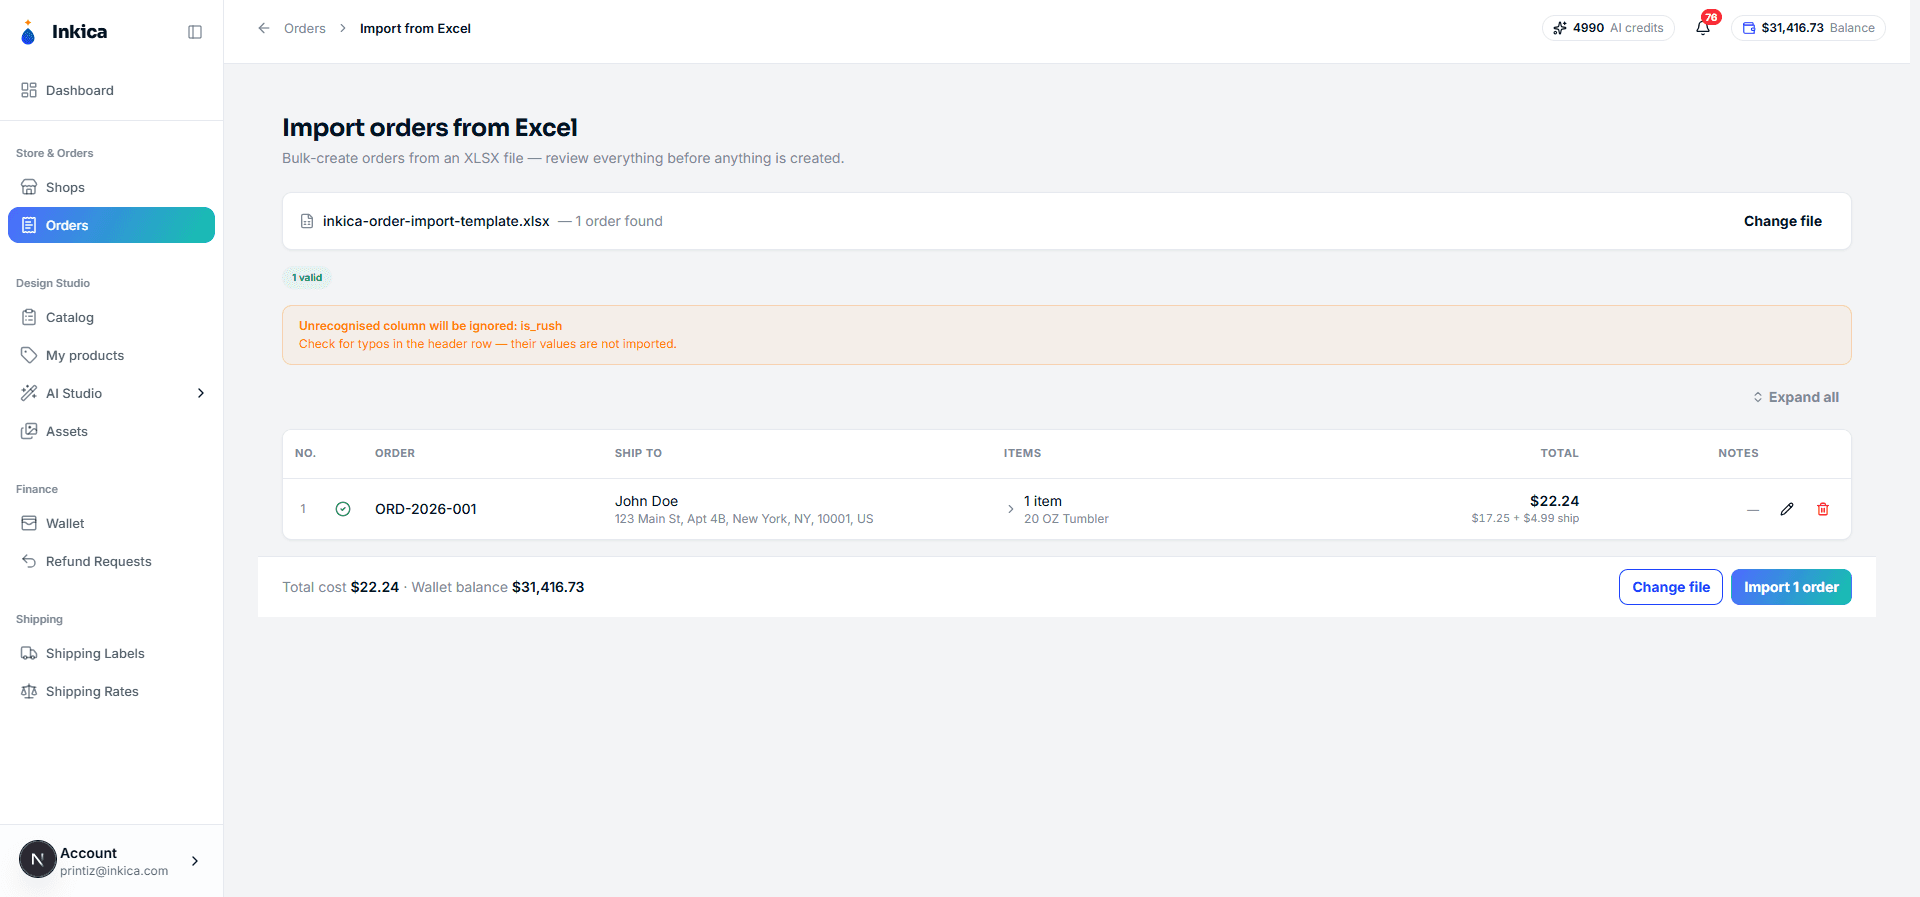
Drag and drop the file into the box or click Choose file. The system reads the file and immediately shows a preview table — no real orders are created and nothing is charged yet — with the number of valid and invalid orders, plus the total cost if all valid orders are imported.
Any column name that’s misspelled or doesn’t exist shows an orange warning “Unrecognised column will be ignored” — that column is ignored entirely, so double-check the column names in your file.
Step 3 — Fix errors on the page (no need to edit the file and re-upload)
For any order with an error, click Fix order (or Edit order for a valid order you want to adjust) to open the edit box right there:
- Edit the shipping details (name, phone, address, state, ZIP…).
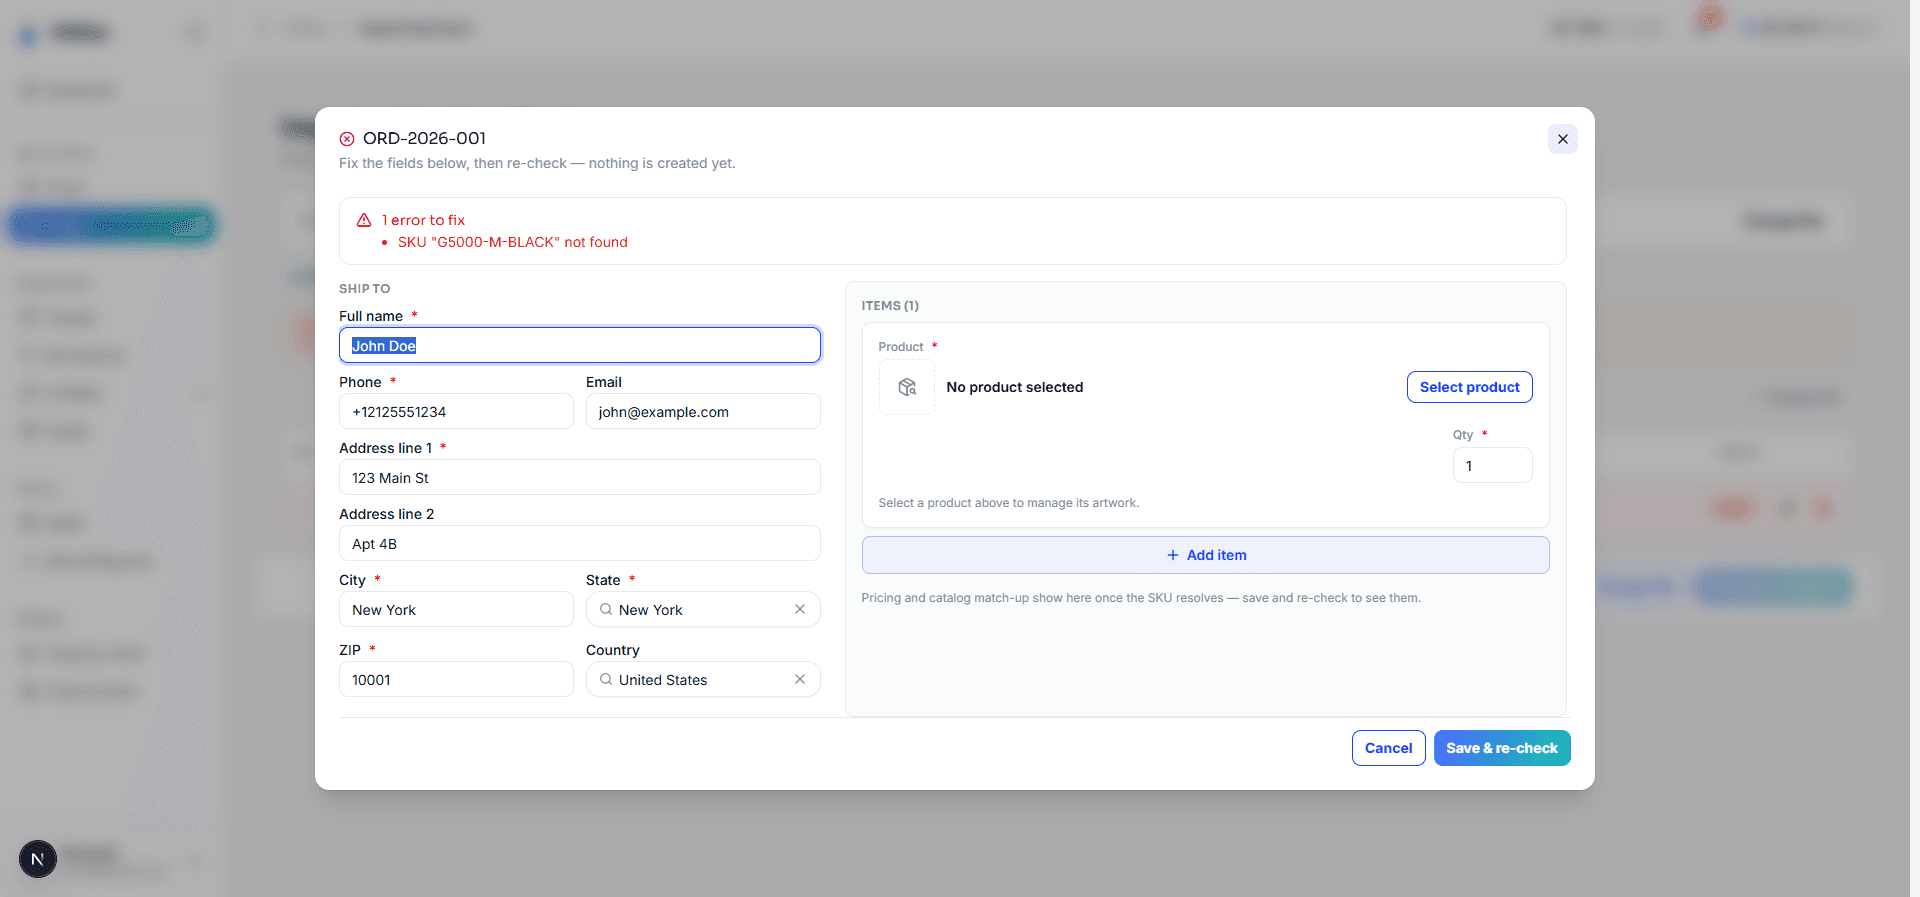
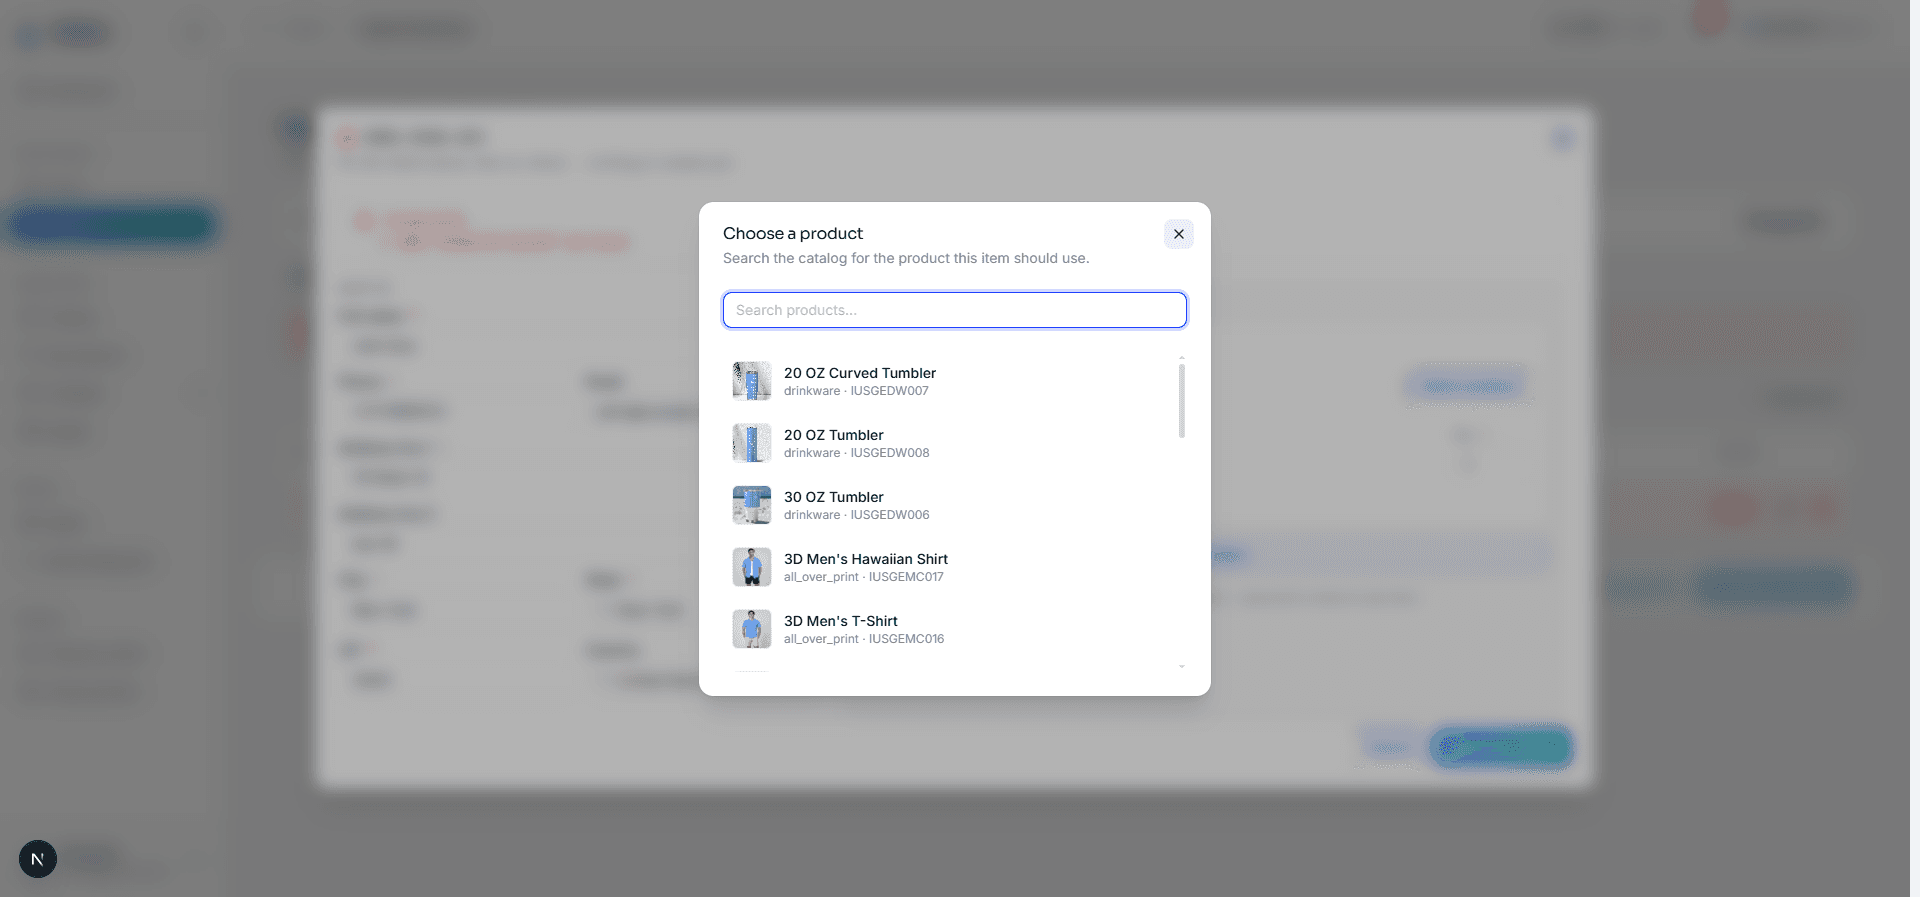
- For each product in the order: change the size/color, edit the quantity, or click Select product to find the right product again if the SKU is mistyped or doesn’t exist — type the product name or code in the search box and scroll down to load more results.
- To add a whole new product to the order (the file was missing a row), click + Add item and pick the product as above.
- To remove a product you no longer need, click the trash icon in its corner (an order must keep at least 1 product).
- To change a product’s print positions, open the “N print positions” section under that product: Remove design / Remove mockup to drop a position, Add design / Add mockup to add one. The product price and order total update after the re-check.
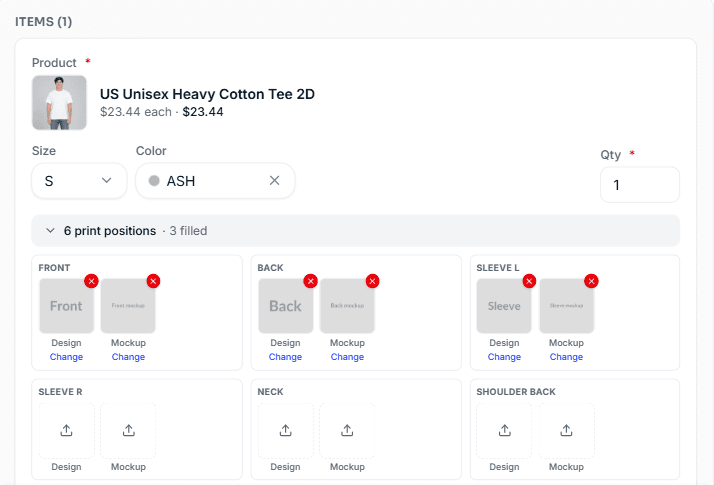
When you’re done, click Save & re-check — the system saves and re-checks right away, without leaving the page.
For any order you don’t want to import any more (including orders with errors), click the trash icon in the Actions column of the table (Remove order from this import) — that order is dropped from this import and the others import as usual.
✅ What you edit or remove on the preview page is exactly what gets imported — no need to fix the original file. Removed orders are not created; edited orders are created exactly as edited, for exactly the amount shown in Total cost.
Missing design
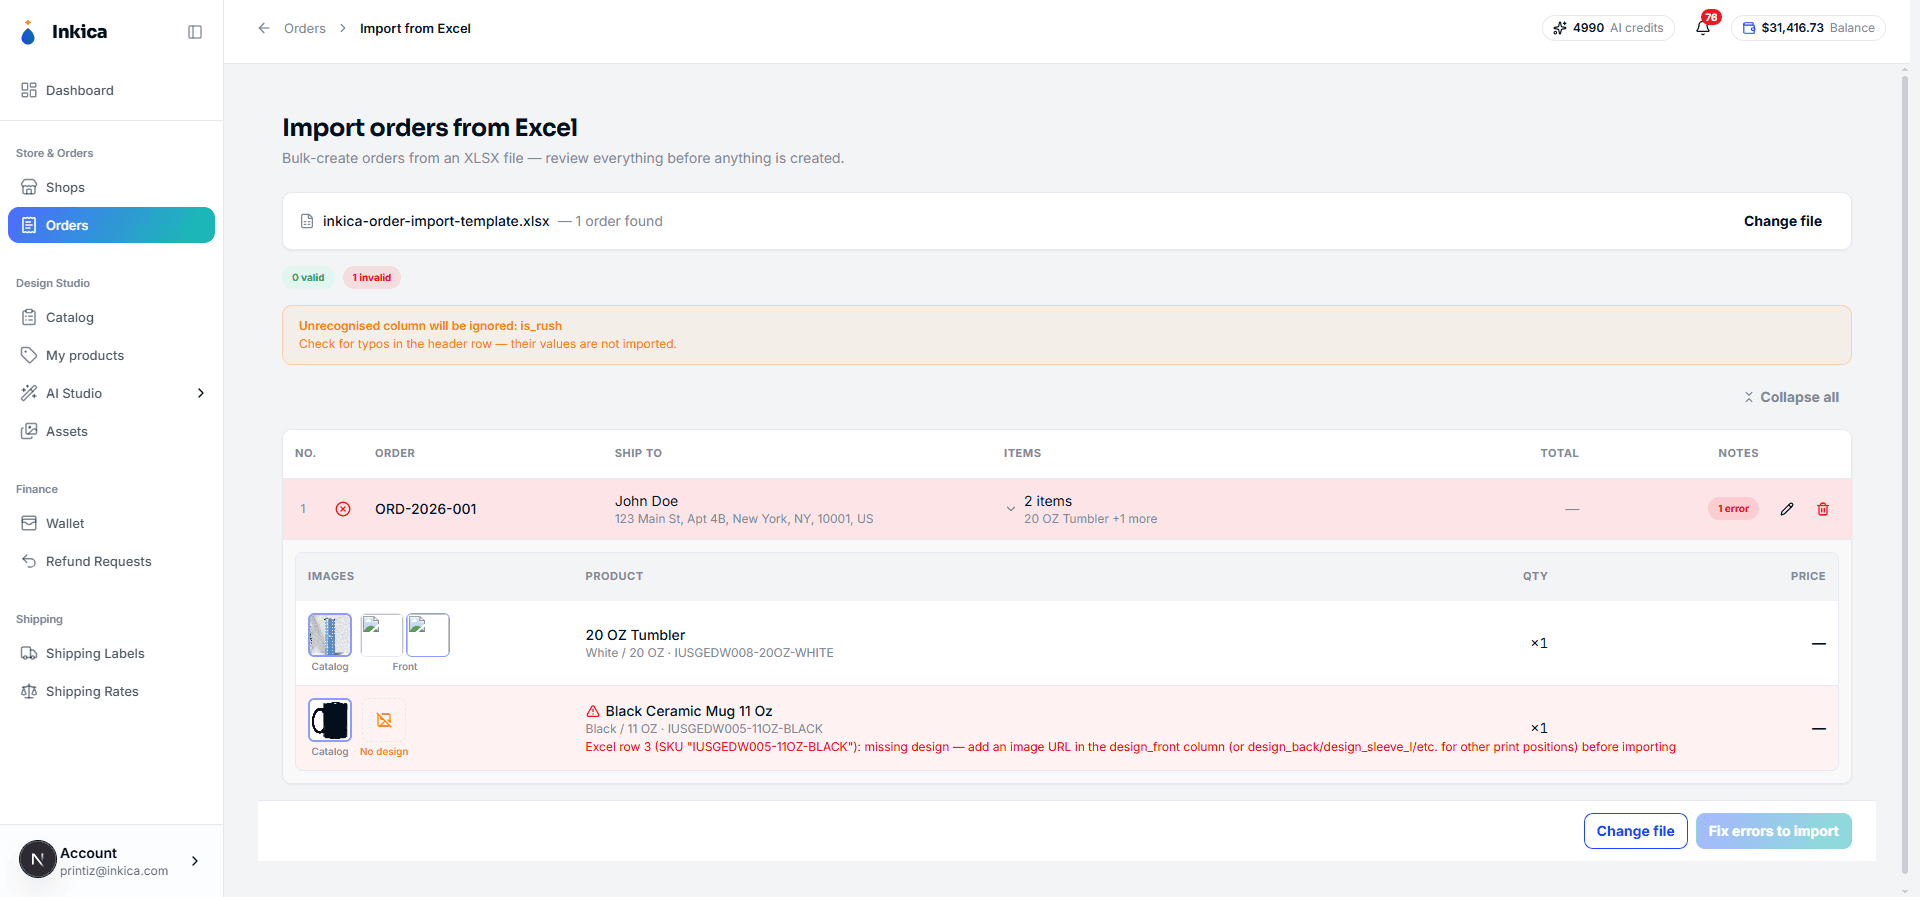
Any product in the file that has no design image in any print position is marked “No design” in the preview table, with a red error line for that product — the whole order is blocked and can’t be imported until it’s fixed. Go to Fix order, click a print position (Front, Back…) to Add design (or Add mockup if you’re sending a finished mockup instead of the original design file), then Save & re-check.
⚠️ A mockup alone doesn’t count as having a design. The
mockup_front/mockup_back… columns are only for sending an extra finished mockup image — the system still needs at least 1 image in adesign_*column before the import can go through.
Some errors are only warnings (Warning) and don’t block the import — for example a phone number in the wrong format, or a product without its own price list that’s temporarily priced at the general rate. An order with a Warning still appears in the valid list and imports normally; it’s only shown in orange so you pay extra attention.
Step 4 — Run the real import
Once the orders are valid, the bottom of the page always shows Total cost and Wallet balance right next to the Import N orders button. If you have enough funds, click this button to create the real orders, deduct the money, and automatically choose the print factory. If your wallet doesn’t have enough, the button changes to Insufficient balance with a Go to Wallet shortcut to top up.
Step 5 — Results
After you click Import, the system immediately shows Import complete (or Import partially failed if some orders failed along the way) with: the number of orders created, the number skipped because they already exist, and the amount actually deducted from your wallet. This amount can occasionally be slightly different from the Total cost at the preview step (usually because shipping was recalculated) — the system tells you clearly if there’s a difference and never deducts silently.
If a few orders fail during the real import (rare, for example a duplicate order ID with another import running at the same time), those orders are not charged — only orders created successfully are. Fix the file and upload it again as is; orders created earlier are skipped automatically and never duplicated.
Click View orders to see the orders you just created in the Orders list.
Re-importing the same old file (with a few more rows fixed) won’t create duplicates — orders created earlier are skipped automatically (shown under “already imported — will be skipped”).
Map products for an order (if needed)
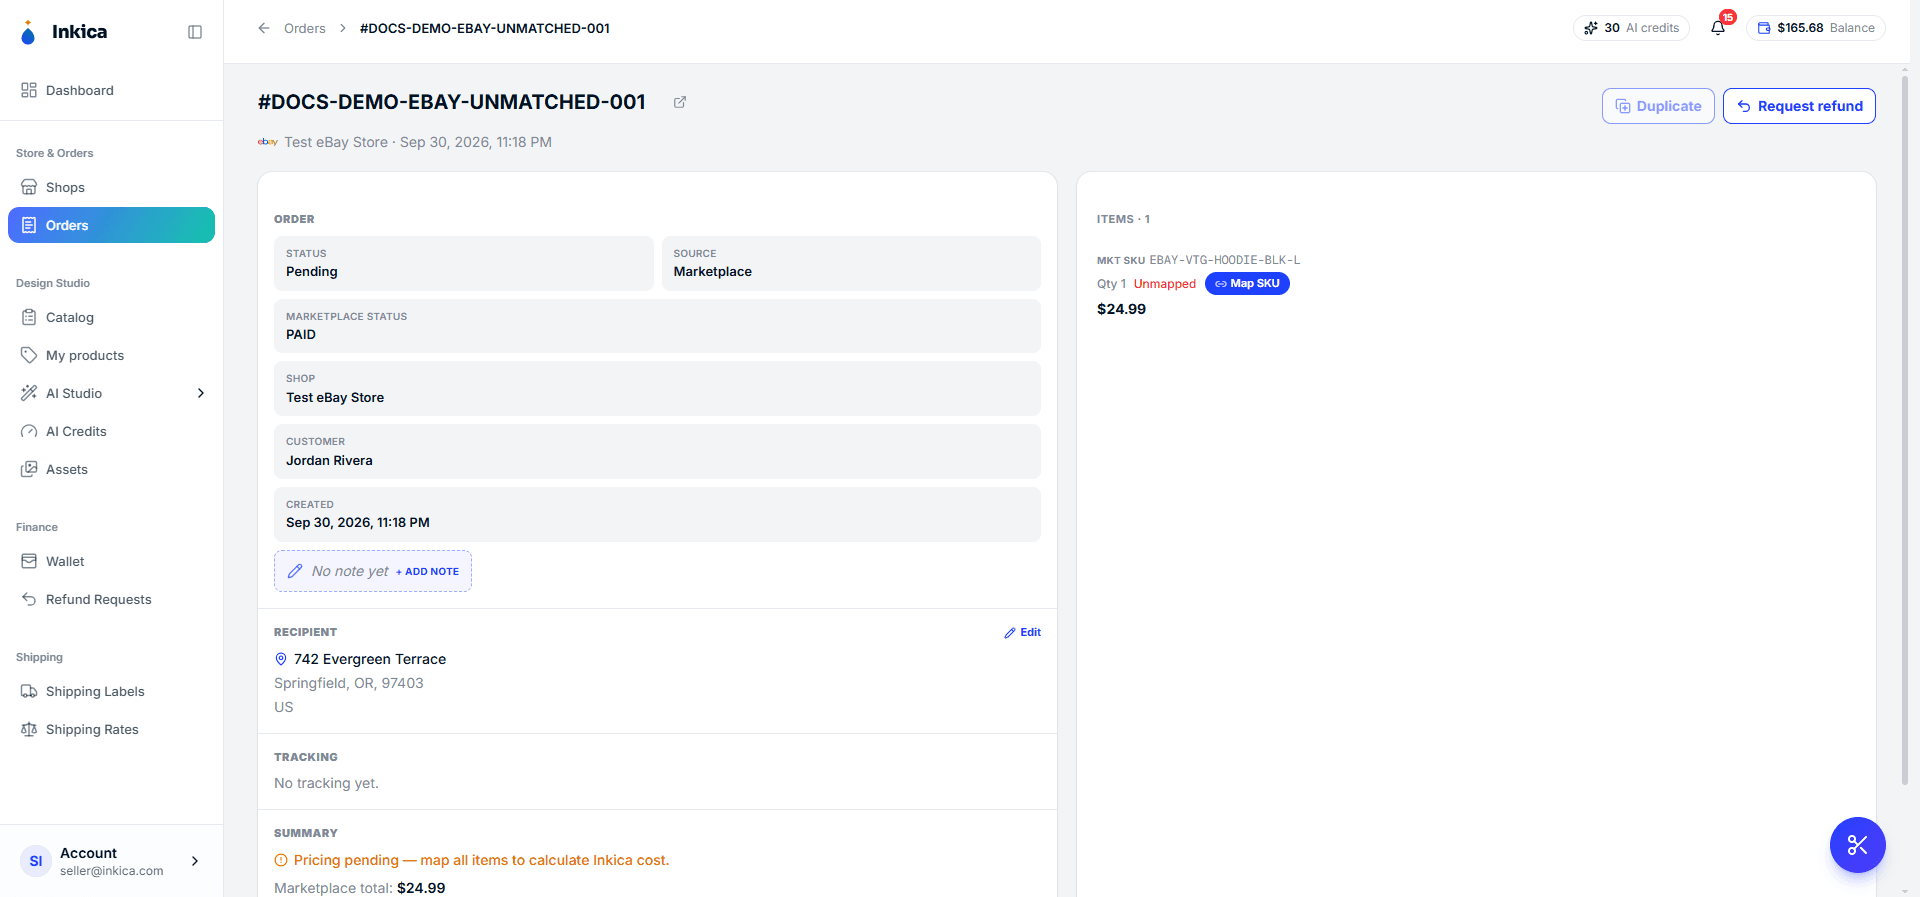
Every item in an order has to be matched to exactly 1 product you’ve created. If that SKU has been matched before, the system does it for you. If it’s a new SKU, the order shows an “unmapped” mark — open the order details and choose the right product for it. From then on this SKU matches automatically.
In the product-matching box, each print position (Front, Back, Sleeve Left…) shows its print area size right next to the position name — for example 30 × 40 cm. Use it to prepare design files at the right size before uploading. Positions without a size are left blank.
⚠️ While an order still has unmatched products, the operations team can’t send it to the print factory.
View & edit matched SKUs (a shop’s Mappings tab)
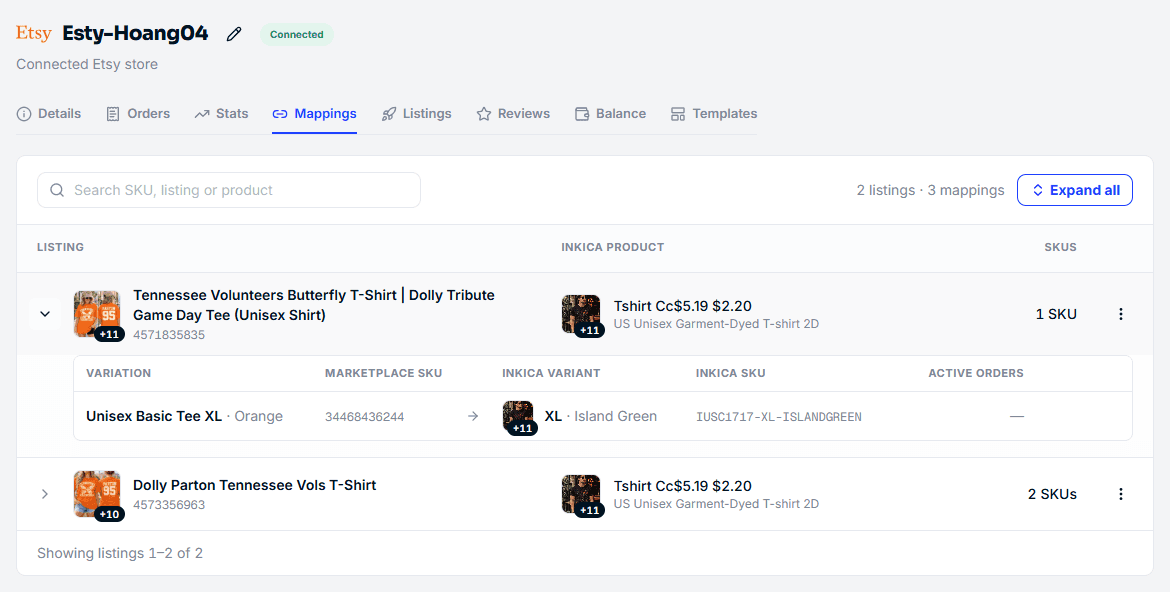
All of a shop’s matched SKUs are in the shop details → Mappings tab, grouped by marketplace listing (1 TikTok Shop product / 1 Etsy listing / 1 eBay item is one row):
- Each listing row shows the image, name and listing ID, the Inkica product that the listing’s SKUs are matched to, and the number of SKUs. Click a row to open the SKU list: Variation (size · color the customer chose on the marketplace) → Inkica variant (size · color Inkica will print), Inkica SKU, and the number of active orders. Use Expand all / Collapse all to open or close everything.
- The search box searches by SKU, listing name or ID, product name, and Inkica SKU.
- Filters (shown only when SKUs in that group exist):
- Needs attention — SKUs matched to a product that has been deleted and need re-matching.
- Size mismatch — the size the customer chose on the marketplace differs from the size Inkica will print, for example the customer chose XXL but XL will be printed. This is almost certainly a wrong match — check it right away so the wrong size doesn’t get printed. The system understands different spellings of the same size (XXL = 2XL, X-Large = XL…), and doesn’t compare colors because every shop names colors differently.
- With active orders — SKUs with orders that haven’t been delivered.
- For each SKU: Remap to switch to a different product/size/color (later orders use the new mapping), and the trash icon to unmap. SKUs that need fixing (unmatched or size mismatch) are highlighted and show the Remap button by default.
- The ⋮ menu at the end of a listing row:
- View on marketplace — open the listing on the marketplace (currently available for Etsy).
- Open Inkica product — open the product details page that the listing is matched to.
- Delete all mappings — unmap all of a listing’s SKUs at once, for when the listing has been removed from the marketplace.
Unmapping doesn’t affect orders that already arrived — they keep their design. Only new orders for that SKU have to be matched again.
Edit an order before it’s sent to the factory
As long as the order hasn’t been sent to the print factory, you can still change a few things right in the order details:
- Shipping address — edit it if an order synced from a marketplace has the wrong address. This can only be edited while the order is pending or rejected.
- Design / personalization of each product in the order — for example, swap the print image or change the name engraved on the product.
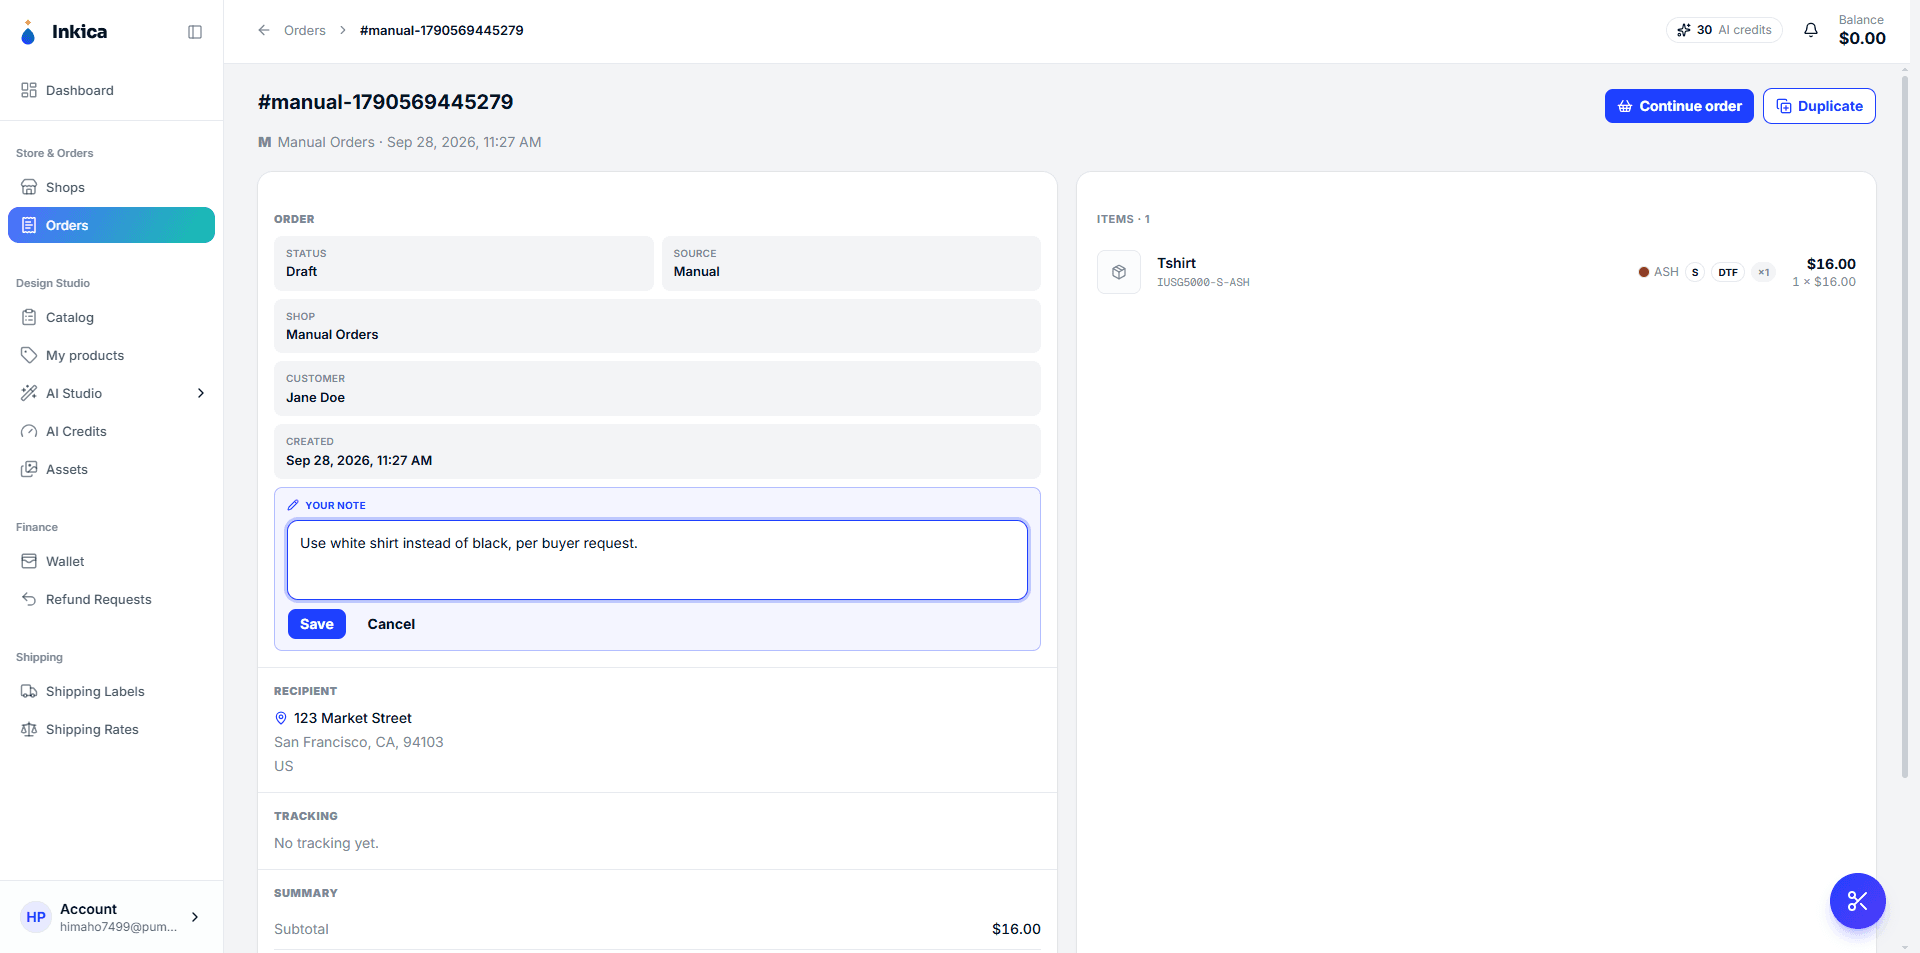
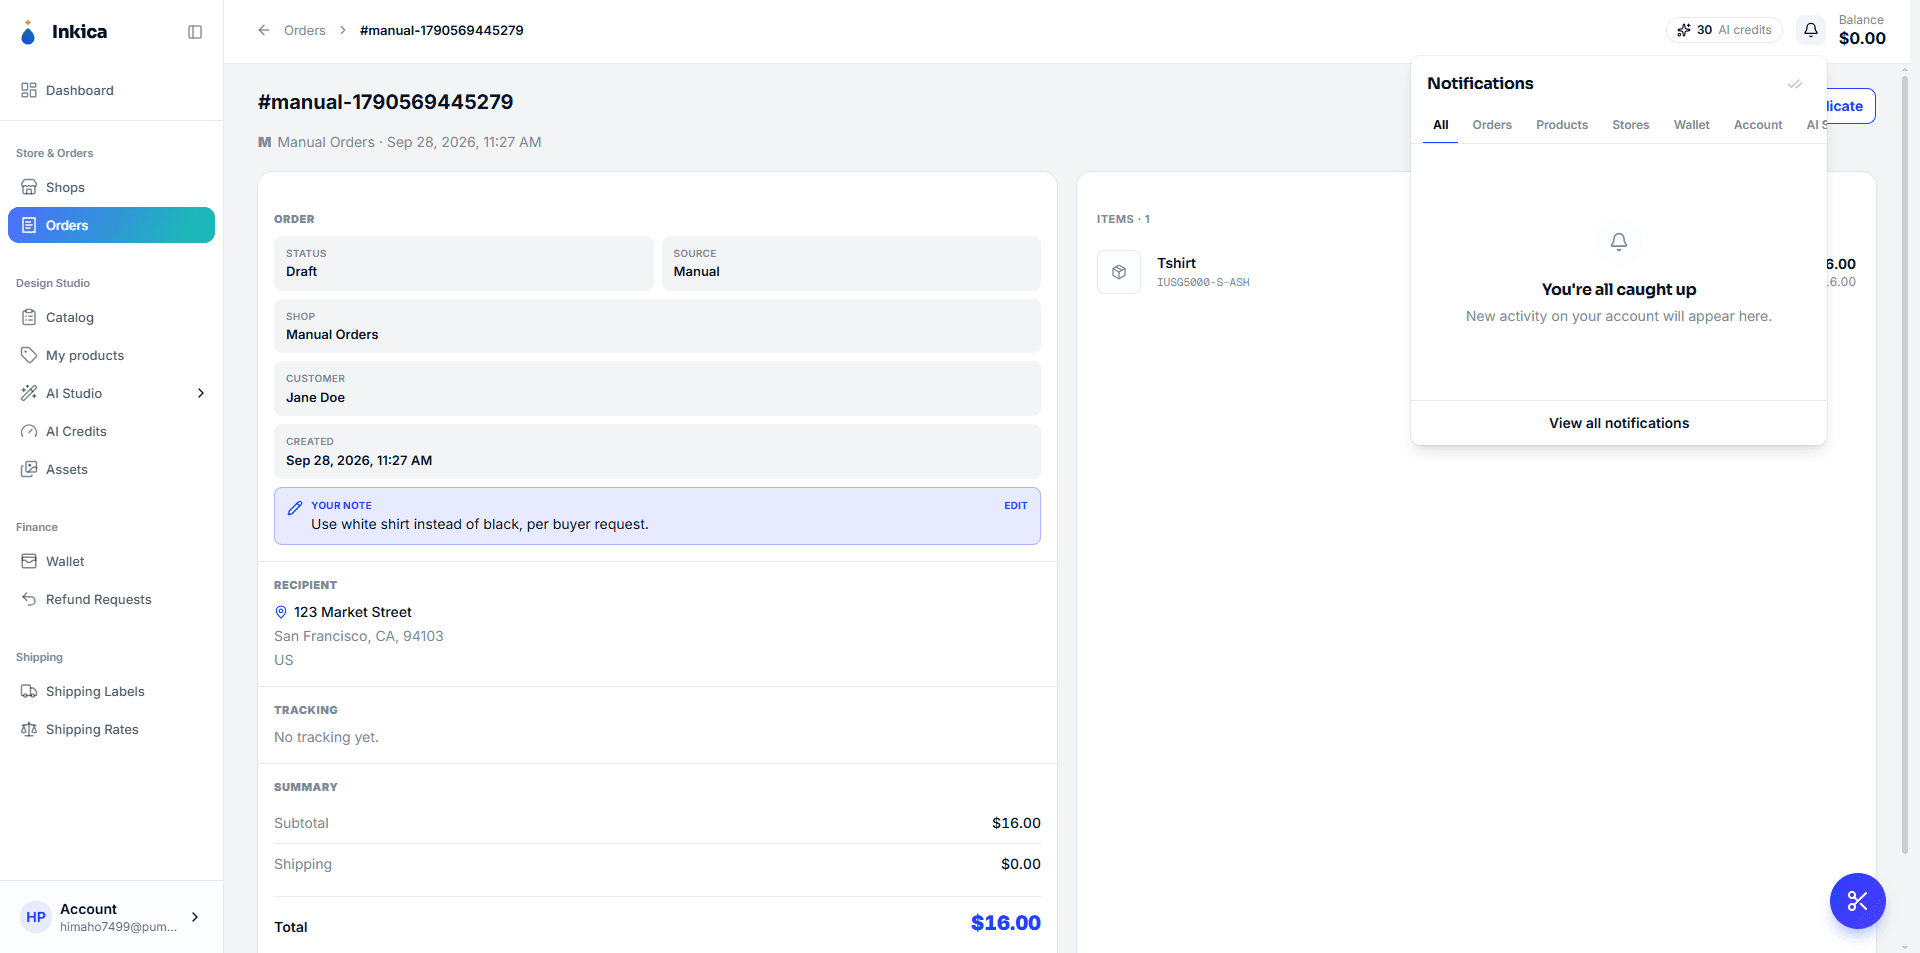
- Your own note (separate from the customer’s note) — use it to leave extra instructions for the operations team, for example “use a white shirt instead of black”.
💰 A paid order that gets edited — for example, changing the address changes the shipping fee, or the operations team adds/removes a print position at your request — the system only charges or refunds the difference, and doesn’t recalculate the whole order. When you change the address, the notice says so right away, for example “Shipping address updated — shipping costs $2.00 more, charged to your wallet” or ”… $2.00 shipping refunded to your wallet”; changing to an address with the same fee changes nothing. Every adjustment appears in your wallet history with the note “Price change on order …”.
If a product in an order has a large quantity but each one needs a different design/personalization (for example name-engraved necklaces, each with a different name), you can Split that line into separate lines and edit each one individually. To combine them again, click Merge.
Duplicate an order (resend)
To create an order identical to an old one (for example, the customer reordered, or you need to resend because of a mistake), open the old order’s details and click Duplicate. The system creates a new draft with all the customer and product information; adjust it if needed and Submit as usual.
Find orders
In the Orders list, use the Search box to search by order ID or customer name — you can also paste several order IDs at once (one per line). You can also filter by shop, marketplace, status, and date range.
🕒 The date range uses US time (West Coast, PDT/PST — the same time eBay Seller Hub shows) and the date the customer ordered on the marketplace, so the number of orders per day matches the marketplace. Vietnam is 14–15 hours ahead of US time: an order placed at 9:25 PM on Oct 30 in the US (11:25 AM on Oct 31 in Vietnam) falls on Oct 30. That is why, in the morning or around noon in Vietnam, Today still picks yesterday’s date on the Vietnamese calendar.
To export the list to a file to save or send to someone, click Export XLSX to download it as an Excel file. The Order Date column in the file also uses the US date.
Reading the Orders list
- The Shop column shows which shop the order belongs to (click it to go to the shop page), along with the marketplace status (for example Awaiting shipment, Paid) and the amount the customer paid on the marketplace.
- The Status & Total column shows the order’s status in Inkica and the amount Inkica charges, compactly on one line:
item price + shipping type + shipping fee. The shipping type is Std (standard), Priority, Express, or Self (you provide the label yourself). If the order total differs from the item price plus shipping (for example, because of a surcharge), the difference is shown at the end of the line. Hover over this line for the full breakdown. - The Date column shows when the order was synced to Inkica (Synced …). Marketplace orders also have an Ordered … line — when the customer placed the order on the marketplace, in US time (for example Ordered Oct 30, 9:25 PM PDT), so you can match it against Seller Hub. The order detail page shows this time right under the title too.
- Under the status tabs there are three count buttons — click one to quickly filter to that group, and click again to remove the filter:
- ready to fulfill — orders that are ready; you can click Fulfill right away.
- need mapping — orders with unmatched products that need product matching first.
- need shipping confirm — TikTok orders waiting for you to confirm shipping.
- Each shop’s Orders page (the Orders tab in the shop details) has these same filters and count buttons.
After the order is sent to the print factory
The operations team (Admin/Support) handles this part — you only need to follow along. The order automatically moves through these stages:
Created → Confirmed → Processing → Shipped → Delivered (or Cancelled if the order is canceled)
These stages update automatically, with nothing for you to do. Once a tracking number exists, it’s also automatically reported back to the marketplace — your customer sees the tracking right on their order.

💵 For marketplace orders, the order detail page also has a money block: What your customer paid, What you earned (an estimate after marketplace fees) and Est. profit (= your estimated earnings minus Inkica’s total). eBay orders have their own block, What your buyer paid / Order earnings. These are estimates — eBay may not have posted the order’s fees yet (ad fees usually appear a few minutes after the sale), so earnings can still drop.
If an order is rejected
The operations team can reject an order if they spot a problem (for example, a design that infringes copyright, or an invalid address) — you’ll get a notification with the reason. There’s no need to create a new order:
- Open the order details and fix the issue that was pointed out (for example, click Edit in the recipient address section).
- Click Fulfill — this opens the Resubmit order panel, showing the rejection reason, the products, and the order’s costs.
- Click Resubmit to send it back to the operations team for review.
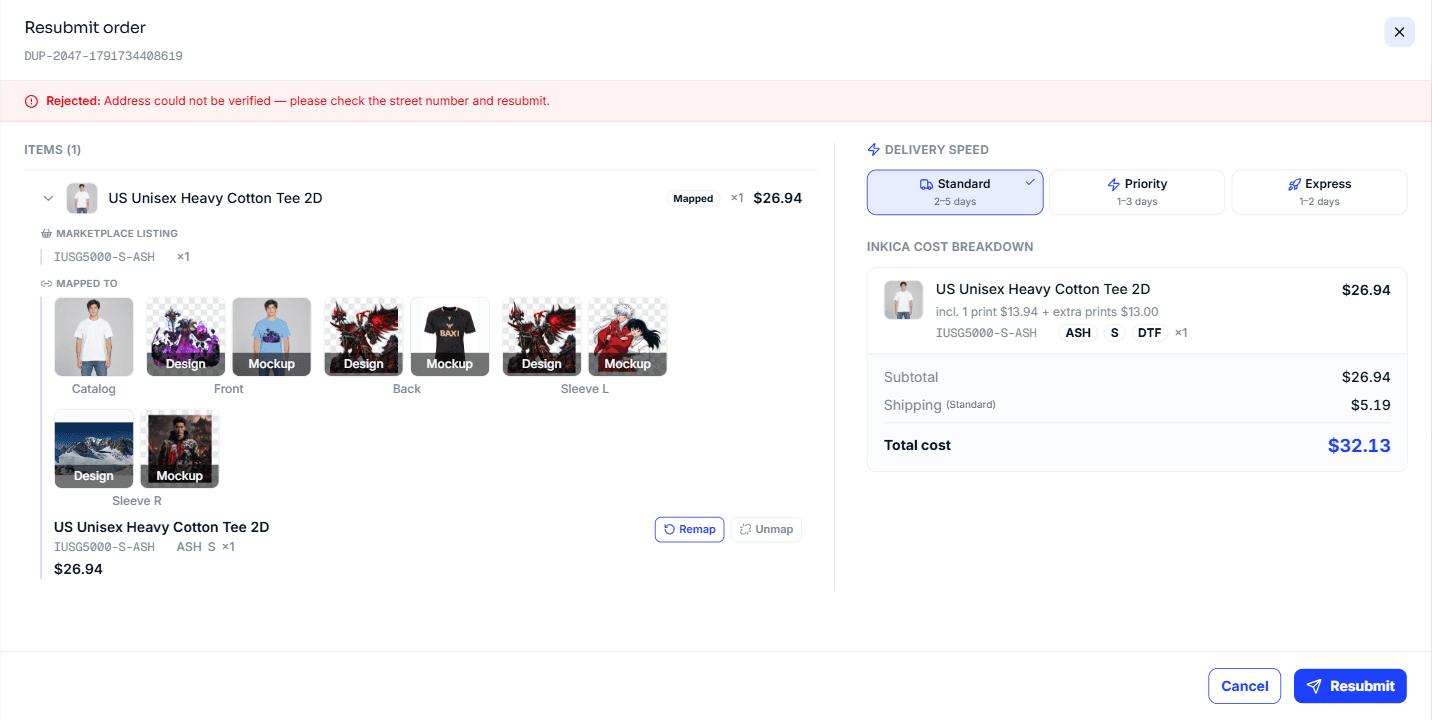
For an order that was already paid, Resubmit doesn’t charge again — only if you change something that changes the price (for example, switching to an address with a different shipping fee, or changing the shipping speed) is your wallet charged extra or refunded the difference, as described in the section above.
TikTok Shop orders
If your TikTok shop uses TikTok-managed shipping (TSS), the order needs your confirmation before the system buys the label for you — click Confirm shipping right on the order row in the Orders list (or in the row’s ⋮ menu, or in the order details). To see all orders waiting for this step, click the need shipping confirm button above the list. If you’ve already clicked Ship in TikTok Seller Center yourself, you don’t need to do this step — the system detects it automatically.
Common problems
| What happens | Why | What to do |
|---|---|---|
| An order stays “unmapped” forever | No one has chosen the right product for it | Open the order and choose the product manually |
| You were charged but can’t find the order | The order may be a draft (not paid/Fulfilled yet) or may have been rejected | Check your wallet history and the order status |
| A customer says they haven’t received the item even though the system says it was delivered | The tracking data is inconsistent | Check the tracking number directly on the carrier’s website |
| An order has a print error/was lost/… | The operations team needs to review it and refund | See Refund requests |
| You want to cancel an order you created (not yet sent to the factory) | For a marketplace order you haven’t clicked Fulfill on yet (status Pending): in the Orders list, open the order’s menu → Mark as handled elsewhere (the order is canceled on Inkica; use it when you’ve already handled the order elsewhere — nothing changes on the marketplace); to go back, choose Undo handled elsewhere. Once you’ve clicked Fulfill (Assigned onward) this option is gone, because Inkica has taken the order on. Orders created by hand / imported from Excel don’t have a self-cancel button | For an order you’ve already clicked Fulfill on, or one created by hand/imported: contact the operations team to cancel it for you |
Automatic notifications
You get notified inside the system (no need to refresh the page) when: a new order arrives, an order is sent to the factory successfully, a shipping label is purchased, your wallet is charged, or an order is rejected. See the full history in Notifications.
To understand more about how the print factory processes orders (for the operations team), see fulfillment-user-guide.md.
◀ Create products to sell · Contents · Next: Fast shipping ▶